blog
How to Cluster Atlassian Server Apps in Your Data Center – JIRA, Confluence, Stash with MySQL Galera Cluster

Atlassian apps are widely used by development teams to facilitate software development and collaboration. For larger teams who require enterprise-grade tools, you might want to host the applications in your own data center and cluster them for high availability and performance.
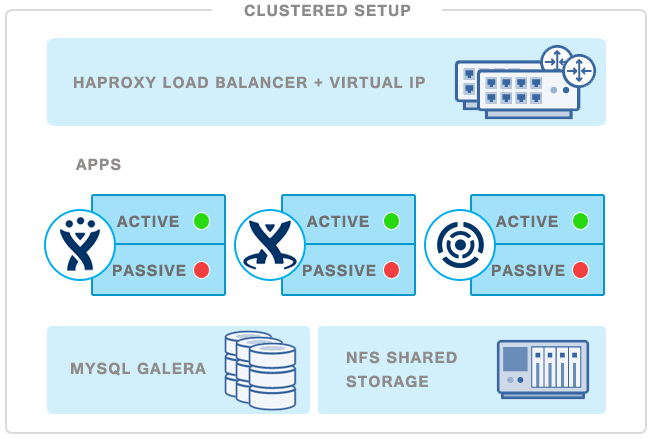
In this blog post, we are going to deploy a redundant active-passive setup for JIRA with clustered MySQL and NFS shared storage. Note that some Atlassian applications (JIRA, Confluence and Stash) already has built-in clustering support, and these require you to have a Data Center license. In this blog, we will show you how to cluster the regular/standalone JIRA server product by deploying an active JIRA server with an additional passive stand-by instance for failover purposes.
The following is our architecture diagram:
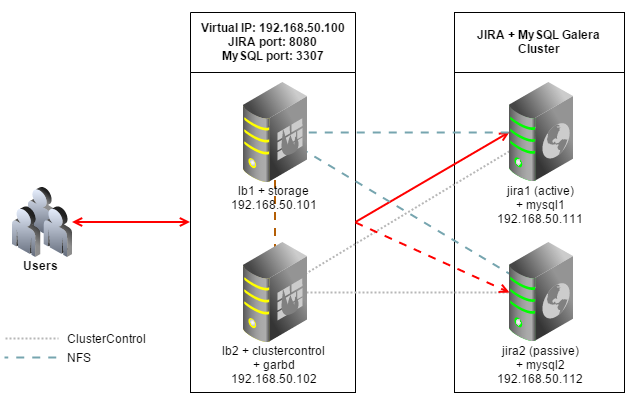
All hosts are running Debian Wheezy 64bit, we will use Galera Cluster for MySQL as database backend. Iptables is disabled to simplify the deployment. JIRA and MySQL services are connected via a virtual IP to provide single point of access.
Our setup consists of 4 servers:
- lb1: HAproxy + keepalived (master)
- lb2: HAproxy + keepalived (backup) + ClusterControl + garbd
- jira1: JIRA (active) + database server
- jira2: JIRA (passive) + database server
Prerequisite
- Ensure all hosts have the following host definition inside /etc/hosts:
192.168.50.100 jira virtual-ip 192.168.50.101 lb1.local lb1 192.168.50.102 lb2.local lb2 clustercontrol 192.168.50.111 jira1.local jira1 mysql1 192.168.50.112 jira2.local jira2 mysql2 - Ensure each host has proper FQDN set up as per host definition above. For example on lb1:
$ hostname -f
lb1.local
Deploying Galera Cluster for MySQL
- To set up Galera Cluster, go to the Galera Configurator to generate a deployment package. In the wizard, we used the following values when configuring our database cluster (note that we specified one of the DB nodes twice under Database Servers’ text field) :
Vendor                 : Codership
MySQL Version          : MySQL 5.6.x
Infrastructure         : none/on-premises
Operating System       : Debian 7.1.x
Number of Galera Servers : 3
Max connections        : 200
OS user                : root
ClusterControl Server  : 192.168.50.102
Database Servers       : 192.168.50.111 192.168.50.112 192.168.50.112
At the end of the wizard, a deployment package will be generated and emailed to you.
- Download and extract the deployment package:
$ wget https://severalnines.com/galera-configurator3/tmp/wb06357009915302877/s9s-galera-codership-3.5.0.tar.gz $ tar -xzf s9s-galera-codership-3.5.0.tar.gz - Before we proceed with the deployment, we need to perform some customization when deploying a two-node Galera cluster. Go to ~/s9s-galera-codership-3.5.0/mysql/config/cmon.cnf.controller and remove the repeated node IP next to mysql_server_addresses so it becomes as below:
mysql_server_addresses=192.168.50.111,192.168.50.112 - Now we are ready to start the deployment:
$ cd ~/s9s-galera-codership-3.5.0/mysql/scripts/install/ $ bash ./deploy.sh 2>&1 | tee cc.log - The database cluster deployment will take about 15 minutes, and once completed, the ClusterControl UI is accessible at https://192.168.50.102/clustercontrol . Enter the default admin email address and password on the welcome page and you should be redirected to the ClusterControl UI dashboard.
- It is recommended to run Galera on at least three nodes. So, install garbd, a lightweight arbitrator daemon for Galera on the ClusterControl node from the ClusterControl UI. Go to Manage > Load Balancer > Install Garbd > choose the ClusterControl node IP address from the dropdown > Install Garbd.
You will now see the MySQL Galera Cluster with garbd installed as per below:

Deploying Load Balancers and Virtual IP
- Before we start to deploy the load balancers, make sure lb1 is accessible using passwordless SSH from ClusterControl/lb2. On lb2, copy the SSH keys to lb1, 192.168.50.101:
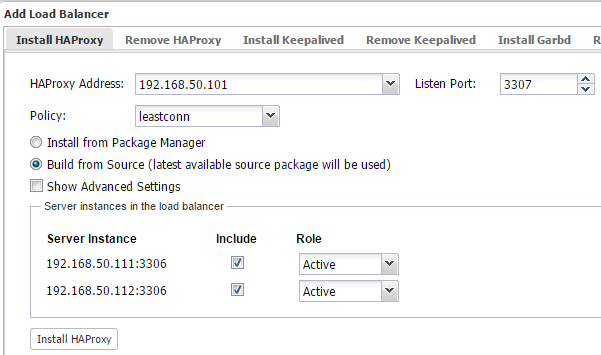
$ ssh-copy-id 192.168.50.101 - Login to ClusterControl, drill down to the database cluster and click the Add Load Balancer button. Deploy HAProxy on lb1 and lb2 using ‘Build from Source’, similar to the below:
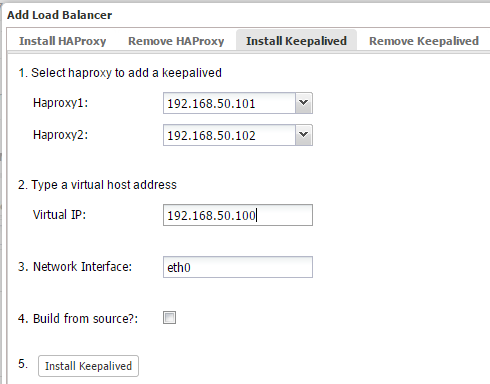
- Install Keepalived on lb1(master) and lb2(backup) with 192.168.50.100 as virtual IP:
- The load balancer nodes have now been installed, and are integrated with ClusterControl. You can verify this by checking out the ClusterControl summary bar:

At the moment, MySQL Galera Cluster is load balanced with virtual IP, 192.168.50.100 listening on port 3307.
- We need to add the load balancing definition for JIRA which will run on port 8080. Since we are sharing the same JIRA home directory through NFS, we need to disable failback, which means if jira1 goes down and comes back up, it will remain passive. The other node will hold the active status, and if it goes down, then jira1 will become active again.To achieve this, we need to configure the HAProxy with stick-table. The failover scenario is further explained further down in the ‘Verifying the Architecture’ section. On lb1 and lb2, open /etc/haproxy/haproxy.cfg and add the following lines:
peers LB peer lb1.local 192.168.50.101:1234 peer lb2.local 192.168.50.102:1234 frontend jira_8080_fe bind *:8080 default_backend jira_8080_be backend jira_8080_be mode http option httpchk OPTIONS /secure option forwardfor option httplog balance source stick-table type ip size 1 nopurge peers LB stick on dst server jira1.local 192.168.50.111:8080 check server jira2.local 192.168.50.112:8080 check backup - Restart HAProxy to apply the changes by killing the process:
$ killall -9 haproxy && /usr/sbin/haproxy -D -f /etc/haproxy/haproxy.cfg -sf
** HAProxy installation from source does not come with init script, so kill and start the process as mentioned above to restart it. Alternatively, you can just kill the HAProxy process and let ClusterControl recover it.
Setting up NFS Server
The following steps should be performed on lb1.
- Install NFS server:
$ apt-get update $ apt-get install -y nfs-kernel-server nfs-common rpcbind - Create a directory to be mounted as NFS shares:
$ mkdir -p /exports/jira - Add the following line into /etc/exports:
/export/jira 192.168.50.0/24(rw,sync,no_subtree_check,no_all_squash,no_root_squash) - Restart NFS daemon to export the share directory:
$ service nfs-kernel-server restart
Setting up NFS Client
The following steps should be performed on jira1 and jira2.
- Install NFS client:
$ apt-get update $ apt-get install -y nfs-common rpcbind - Create a mount point for NFS:
$ mkdir -p /mnt/jira - Ensure you can see the NFS mount from the client host:
$ showmount -e 192.168.50.101 Export list for 192.168.50.101: /export/jira 192.168.50.0/24 - Add the following line into /etc/fstab:
192.168.50.101:/export/jira /mnt/jira nfs rw,sync,hard,intr 0 0 - Mount the NFS share as listed inside /etc/fstab and change the permission of Jira mount point to 777:
$ mount -a
$ chmod 777 /mnt/jira
Verify that you have mounted the NFS share correctly:
$ df -h
Filesystem                   Size  Used Avail Use% Mounted on
rootfs                        19G  2.6G   16G  15% /
udev                          10M     0   10M   0% /dev
tmpfs                        201M  228K  201M   1% /run
/dev/mapper/debian74-root     19G  2.6G   16G  15% /
tmpfs                        5.0M     0  5.0M   0% /run/lock
tmpfs                        402M     0  402M   0% /run/shm
/dev/sda1                    228M   18M  199M   9% /boot
192.168.50.101:/export/jira   19G  1.5G   17G   9% /mnt/jira
Installing JIRA on the first node
The following steps should be performed on jira1. We will need to completely set up JIRA on the first node before proceeding to the second JIRA node.
- Download Atlassian JIRA installer and start the installer:
$ wget https://www.atlassian.com/software/jira/downloads/binary/atlassian-jira-6.4-x64.bin
$ chmod 755 atlassian-jira-6.4-x64.bin
$ ./atlassian-jira-6.4-x64.bin
** Accept the default values except for ‘Default location for JIRA’, where you need to specify the NFS mount point, /mnt/jira as the default location for JIRA data. JIRA installation directory should be installed under /opt/atlassian/jira.
- Download the MySQL Java connector from MySQL’s download page, extract and copy the JAR file to JIRA library:
$ wget http://dev.mysql.com/get/Downloads/Connector-J/mysql-connector-java-5.1.34.tar.gz $ tar -xzf mysql-connector-java-5.1.34.tar.gz $ cd mysql-connector-java-5.1.34 $ cp mysql-connector-java-5.1.34-bin.jar /opt/atlassian/jira/lib/ - Restart JIRA to activate the MySQL Java connector and to start the installation process:
$ service jira stop
$ service jira start
Ensure the JIRA service is started correctly by looking into the following log file:
$ tail -100f /opt/atlassian/jira/logs/catalina.out - Create a schema for JIRA by using Manage > Schemas and Users > Create Database and create a database called “jira”. Then assign all privileges to the schema with a wildcard host (‘%’).
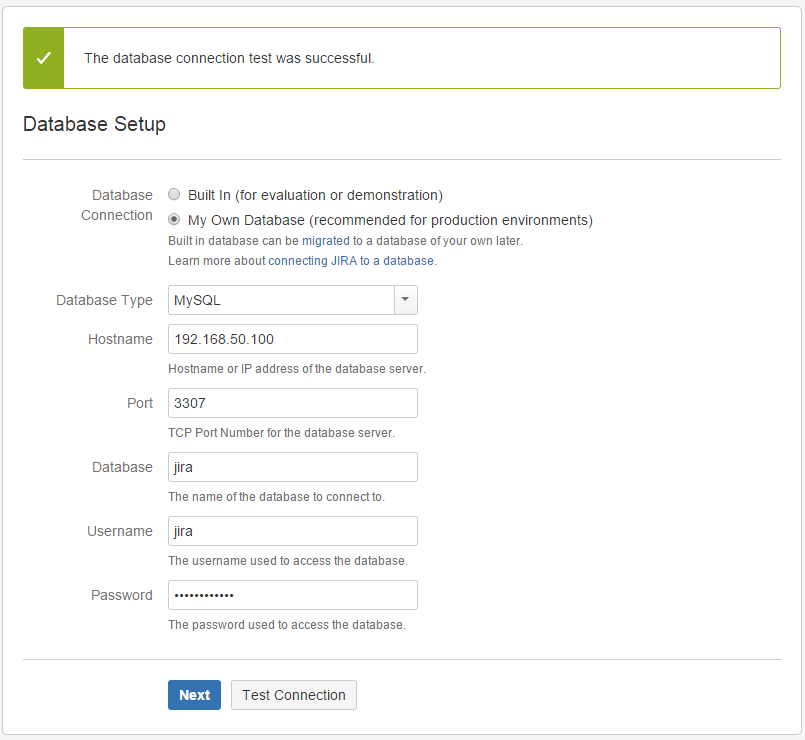
- Now, open a browser and open the JIRA installation page through virtual IP at http://192.168.50.100:8080 . From the installation wizard page, choose ‘I’ll set it up myself’ > My Own database, specify the database credentials as per below screenshot:
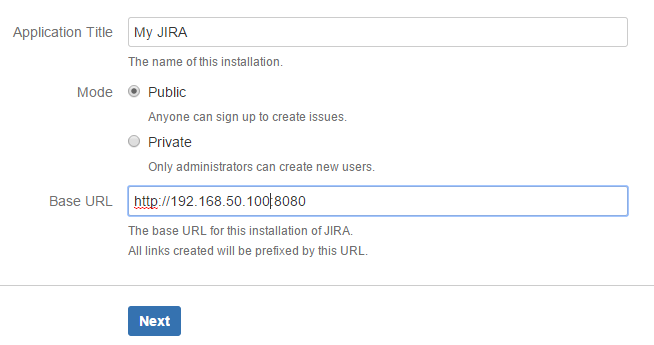
- Next, specify the virtual IP as the Base URL:
- Choose the type of JIRA that you want to install and enter the license and wait JIRA to finalize the installation. Then, setup the Administrator account and click Next.You should now see the JIRA system dashboard:
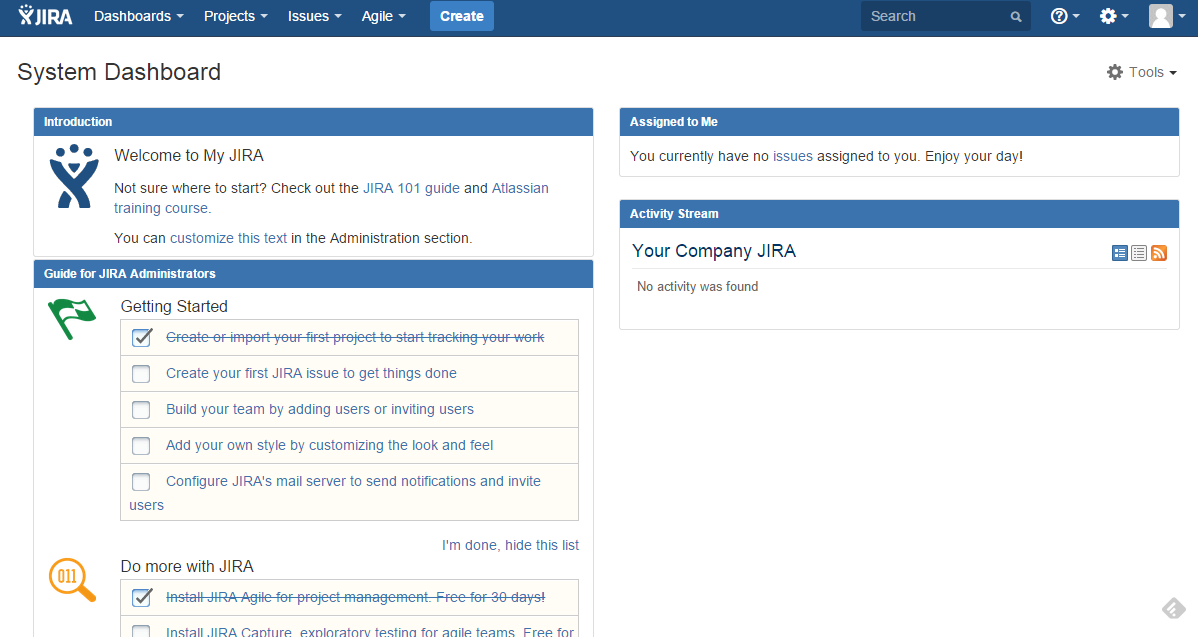
Installation of JIRA on the first node is complete.
Installing JIRA on the second node
The following steps should be performed on jira2.
- Download Atlassian Jira installer and start the installer:
$ wget https://www.atlassian.com/software/jira/downloads/binary/atlassian-jira-6.4-x64.bin
$ chmod 755 atlassian-jira-6.4-x64.bin
$ ./atlassian-jira-6.4-x64.bin
** Accept the default values. The JIRA installation directory should be under /opt/atlassian/jira, while the data directory should be under /var/atlassian/application-data/jira.
- Download the MySQL Java connector from MySQL’s download page:
$ wget http://dev.mysql.com/get/Downloads/Connector-J/mysql-connector-java-5.1.34.tar.gz $ tar -xzf mysql-connector-java-5.1.34.tar.gz $ cd mysql-connector-java-5.1.34 $ cp mysql-connector-java-5.1.34-bin.jar /opt/atlassian/jira/lib/ - Before starting up the JIRA service on this node, change the jira.home value to the NFS mount point inside the JIRA application properties file:
$ vim /opt/atlassian/jira/atlassian-jira/WEB-INF/classes/jira-application.propertiesUpdate the following line:
jira.home = /mnt/jira - Restart JIRA to apply the changes:
$ service jira stop
$ service jira start
Monitor the bootstrap output from /opt/atlassian/jira/logs/catalina.out. You should see the following error:
******************************************
JIRA startup failed, JIRA has been locked.
******************************************
The failure is expected since the home directory is currently being locked by the first instance. To perform failover in case the primary JIRA (jira1) goes down, refer to the next section.
Failover and Recovery
Take note that, JIRA failover will not be automatic. If jira1 goes down, we need to manually perform the following steps on jira2:
- Remove the JIRA lock file under shared directory:
$ rm -Rf /mnt/jira/.jira-home.lock - Restart Jira on jira2:
$ service jira stop && service jira start
Wait for the bootstrap to complete and JIRA should be started. We should able to access Jira using the virtual IP, http://192.168.50.100:8080/ .
Again, we are trying to achieve a better setup by having a standby server immediately ready if the primary JIRA goes down. When jira1 comes back up, it will not be started since the lock was acquired by jira2. You should see following in the catalina.out for jira1:
******************************************
JIRA startup failed, JIRA has been locked.
******************************************
Repeat the same steps if jira2 goes down.
Verifying the Architecture
- Check the HAProxy statistics at ClusterControl > Nodes > choose the load balancer node, you should see some bytes in and out on the jira_8080_be and haproxy_192.168.50.101_3307 sections:

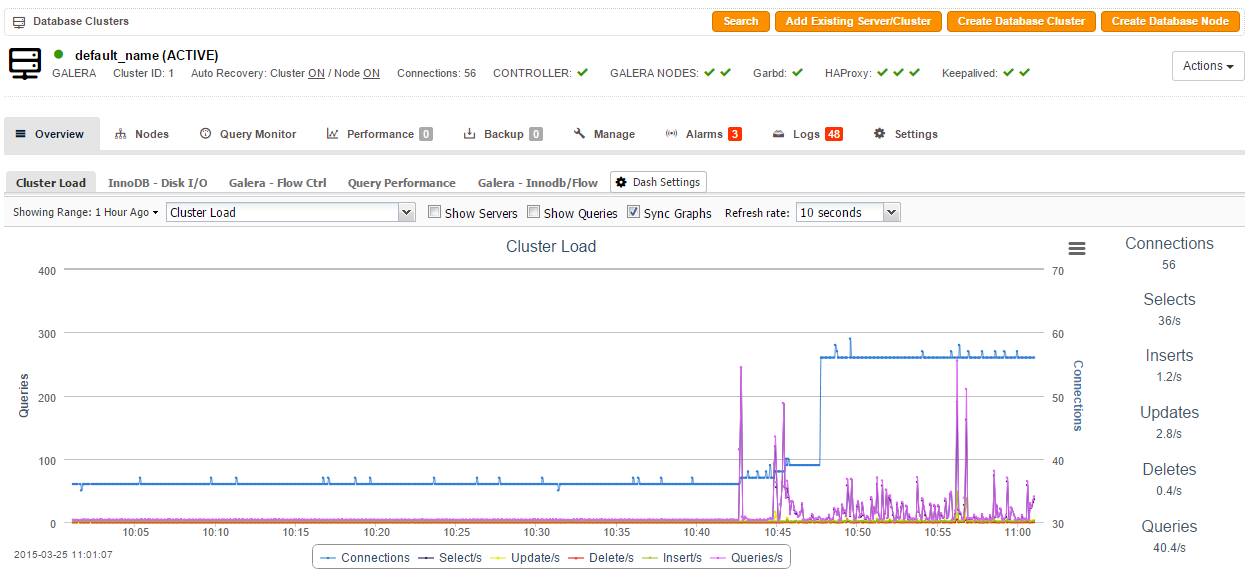
- Check and observe the traffic on your database cluster from the ClusterControl overview page at https://192.168.50.102/clustercontrol:
The steps performed in this blog post are also applicable for other Atlassian apps like Confluence, Stash or any of the other server products. This is not as good as Atlassian’s Data Center clustering product, but it sure provides redundancy at all layers. Happy clustering!


