blog
Full Restore of a MySQL or MariaDB Galera Cluster from Backup

Performing regular backups of your database cluster is imperative for high availability and disaster recovery. If for any reason you lost your entire cluster and had to do a full restore from backup, you would need a reliable and up-to-date backup to start from.
Best Practices for Backups
Some recommendations to consider for a good scheduled backup regime:
- You should be able to completely recover from a catastrophic failure from at least two previous full backups. Just in case the most recent full backup is damaged, lost, or corrupt,
- Your backup should contain at least one full backup within a chosen cycle, normally weekly,
- Store backups away from the current data location, preferably off site,
- Use a mixture of mysqldump and Xtrabackup for extra safety, and not rely on one method,
- Test restore your backups on a regular basis, e.g. every two months.
A weekly full backup combined with daily incremental backup is normally enough. Keeping a number of backups for a period of time is always a good plan, maybe keep each weekly backup for one month. This allows you to recover an older database in case of emergencies or if for some reason you have local backup file corruption.
mysqldump or Xtrabackup
mysqldump is very likely the most popular way of backing up MySQL. It does a logical backup of the data, reading from each table using SQL statements then exporting the data into text files. Restoration of a mysqldump is as easy as creating the dump file. The main drawbacks are that it is very slow for large databases, it is not ‘hot’ and it wipes out the InnoDB buffer pool.
Xtrabackup performs hot backups, does not lock the database during the backup and is generally faster. Hot backups are important for high availability, as they run without blocking the application. This is also an important factor when used with Galera, as Galera relies on synchronous replication. However, restoring an xtrabackup can be a little tricky using manual ways.
ClusterControl supports the scheduling of both mysqldump and Xtrabackup (full and incremental), as well as the backup restoration right from the UI.
Full Restore from Backup
In this post, we will show you how to restore Xtrabackup (full + incremental) onto an empty cluster running on MariaDB Galera Cluster. These steps should also work on Percona XtraDB Cluster or Galera Cluster for MySQL from Codership.
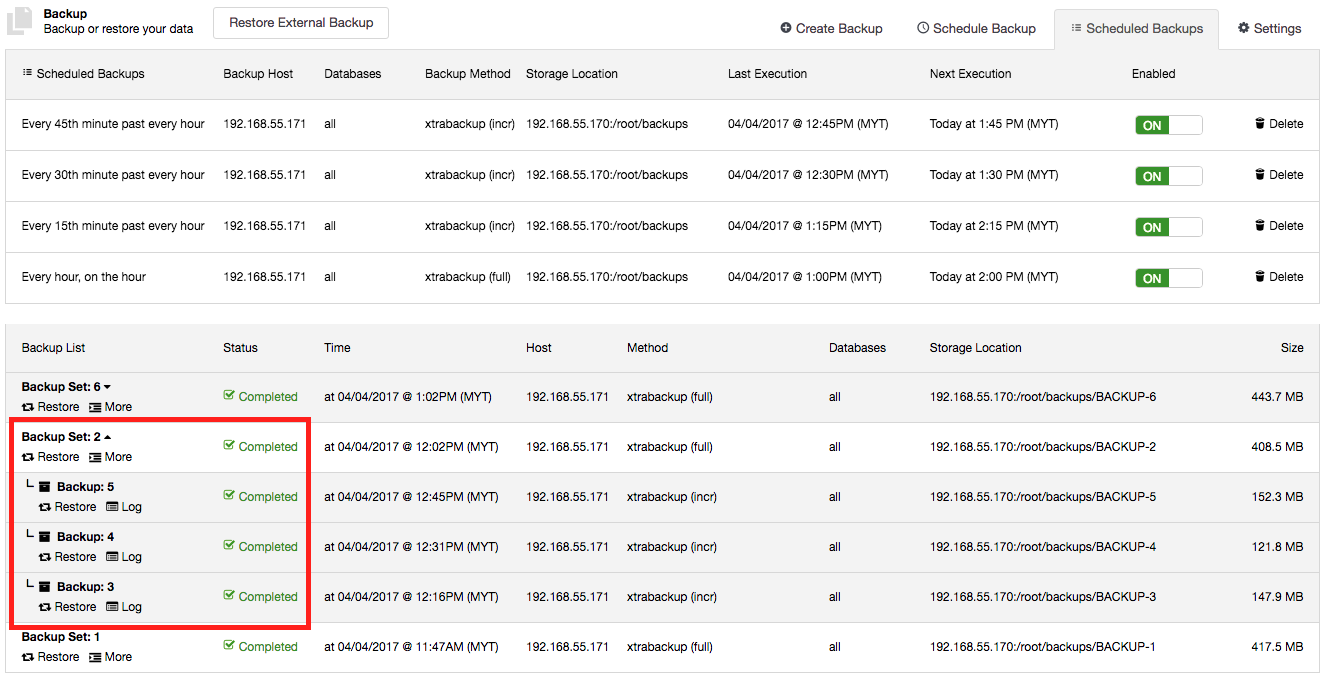
In our original cluster, we had a full xtrabackup scheduled daily, with incremental backups created every hour. The backups are stored on ClusterControl as shown in the following screenshot:
Now, let’s assume we have lost our original cluster and have to do a full restore onto a new cluster. The steps include:
- Set up a new ClusterControl server.
- Set up a new MariaDB Cluster.
- Export the backup records and files to the new ClusterControl server.
- Start the restoration process.
- Start the remaining nodes.
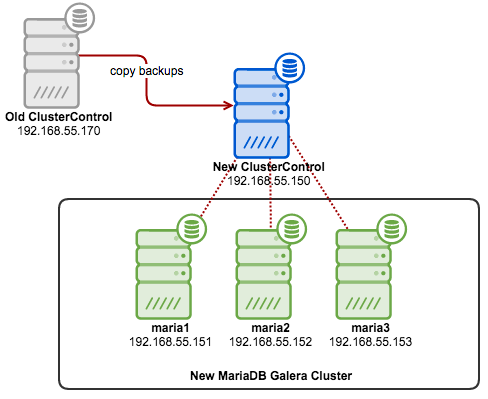
The following diagram illustrates our architecture for this exercise:
Step 1 – Set up New MariaDB Cluster
Install ClusterControl and deploy a new MariaDB Cluster. Go to ClusterControl -> Deploy -> Deploy Database Cluster -> MySQL Galera and specify the required information in the deployment dialog:
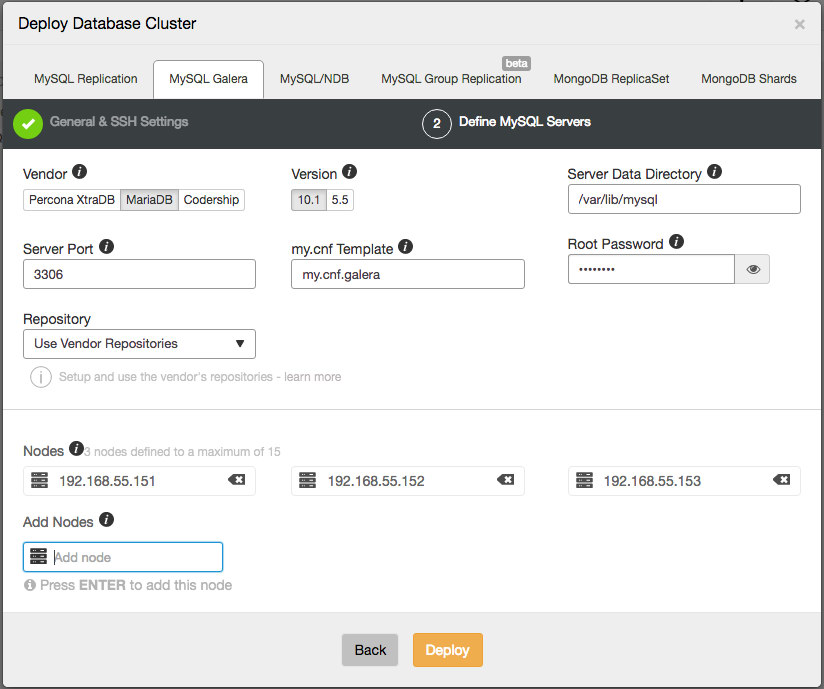
Click on the Deploy button and start the deployment. Since we only have a cluster on the old server so the cluster ID should be identical (cluster ID: 1) in this new instance.
On the old ClusterControl server, export the backup_records table into dump files:
$ mysqldump -uroot -p --single-transaction --no-create-info cmon backup_records > backup_records.sqlThen, perform remote copy of the backup files from the old server into the new ClusterControl server:
$ scp -r /root/backups 192.168.55.150:/root/
$ scp ~/backup_records.sql 192.168.55.150:~
Next is to modify the dump files to reflect the new ClusterControl server IP address. Don’t forget to escape the dot in the IP address:
$ sed -i "s/192.168.55.170/192.168.55.150/g" backup_records.sqlOn the new ClusterControl server, import the dump files:
$ mysql -uroot -p cmon < backup_records.sqlVerify that the backup list is correct in the new ClusterControl server:
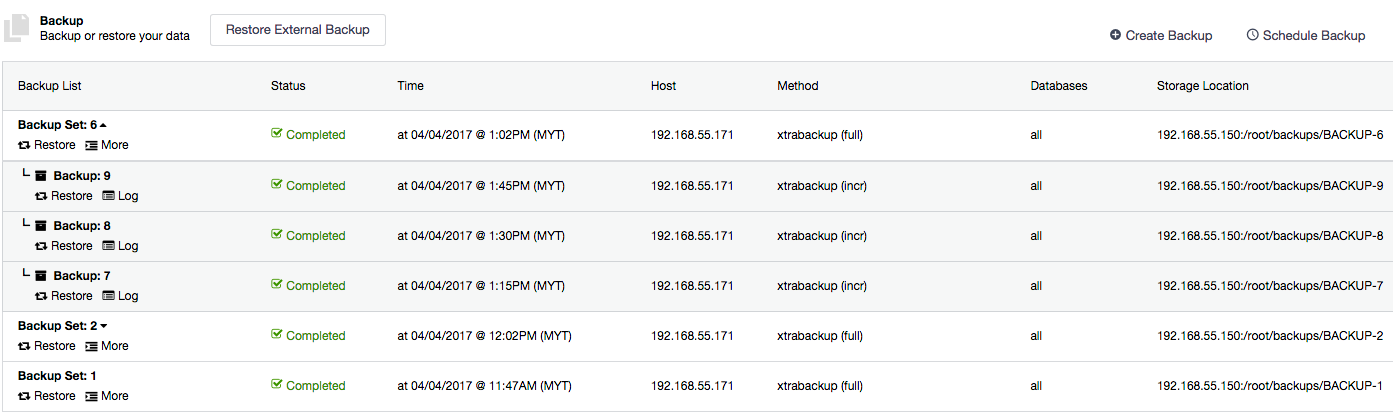
As you can see, all occurences of the previous IP address (192.168.55.170) have been replaced by the new IP address (192.168.55.150). Now we are ready to perform the restoration in the new server.
Step 3 - Perform the Restoration
Performing restoration through the ClusterControl UI is a simple point-and-click step. Choose which backup to restore and click on the “Restore” button. We are going to restore the latest incremental backup available (Backup: 9). Click on the “Restore” button just below the backup name and you will be presented with the following pre-restoration dialog:
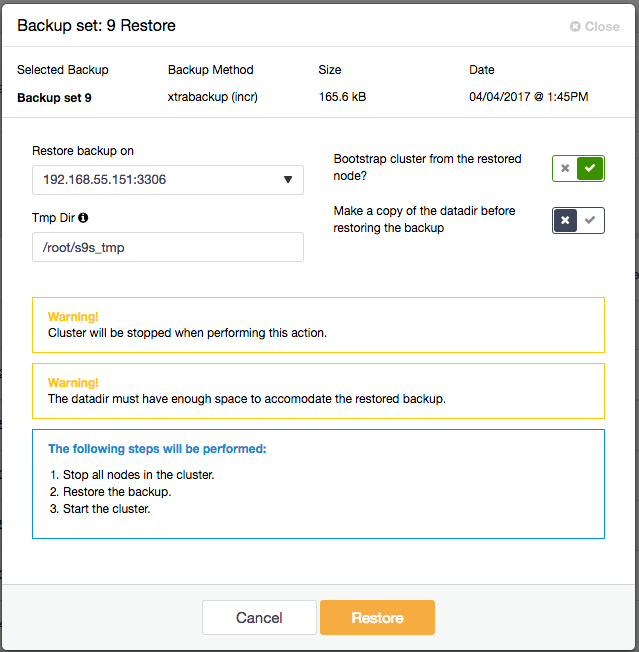
Looks like the backup size is pretty small (165.6 kB). It doesn’t really matter because ClusterControl will prepare all incremental backups grouped under Backup Set 6, which holds the full Xtrabackup. You also have several post-restoration options:
- Restore backup on - Choose the node to restore the backup on.
- Tmp Dir - Directory will be used on the local ClusterControl server as temporary storage during backup preparation. It must be as big as the estimated MySQL data directory.
- Bootstrap cluster from the restored node - Since this is a new cluster, we are going to toggle this ON so ClusterControl will bootstrap the cluster automatically after the restoration succeeds.
- Make a copy of the datadir before restoring the backup - If the restored data is corrupted or not as what you are expected it to be, you will have a backup of the previous MySQL data directory. Since this is a new cluster, we are going to ignore this one.
Percona Xtrabackup restoration will cause the cluster to be stopped. ClusterControl will:
- Stop all nodes in the cluster.
- Restore the backup on the selected node.
- Bootstrap the selected node.
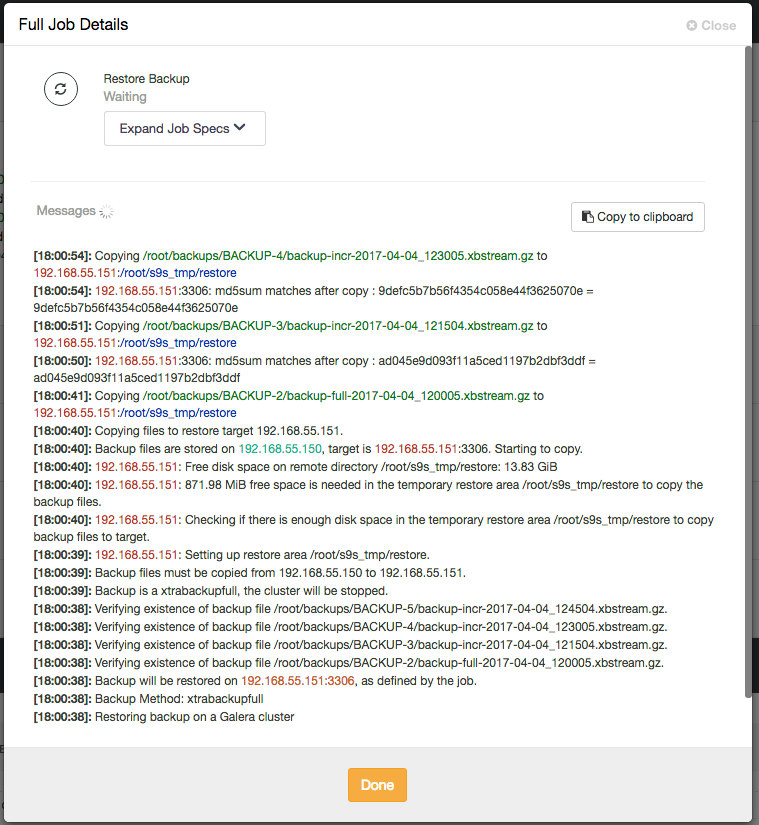
To see the restoration progress, go to Activity -> Jobs -> Restore Backup and click on the “Full Job Details” button. You should see something like this:
One important thing that you need to do is to monitor the output of the MySQL error log on the target node (192.168.55.151) during the restoration process. After the restoration completes and during the bootstrapping process, you should see the following lines starting to appear:
Version: '10.1.22-MariaDB' socket: '/var/lib/mysql/mysql.sock' port: 3306 MariaDB Server
2017-04-07 18:03:51 140608191986432 [Warning] Access denied for user 'cmon'@'192.168.55.150' (using password: YES)
2017-04-07 18:03:51 140608191986432 [Warning] Access denied for user 'cmon'@'192.168.55.150' (using password: YES)
2017-04-07 18:03:51 140608191986432 [Warning] Access denied for user 'cmon'@'192.168.55.150' (using password: YES)
2017-04-07 18:03:52 140608191986432 [Warning] Access denied for user 'cmon'@'192.168.55.150' (using password: YES)
2017-04-07 18:03:53 140608191986432 [Warning] Access denied for user 'cmon'@'192.168.55.150' (using password: YES)
2017-04-07 18:03:54 140608191986432 [Warning] Access denied for user 'cmon'@'192.168.55.150' (using password: YES)
2017-04-07 18:03:55 140608191986432 [Warning] Access denied for user 'cmon'@'192.168.55.150' (using password: YES)
Don’t panic. This is an expected behaviour because this backup set doesn’t store the cmon login credentials of the new ClusterControl cmon password. It has restored/replaced the old cmon user instead. What you need to do is to re-grant cmon user back to the server by running the following statement on this DB node:
GRANT ALL PRIVILEGES ON *.* to cmon@'192.168.55.150' IDENTIFIED BY 'mynewCMONpassw0rd' WITH GRANT OPTION;
FLUSH PRIVILEGES;
ClusterControl then would be able to connect to the bootstrapped node and determine the node and backup state. If everything is OK, you should see something like this:
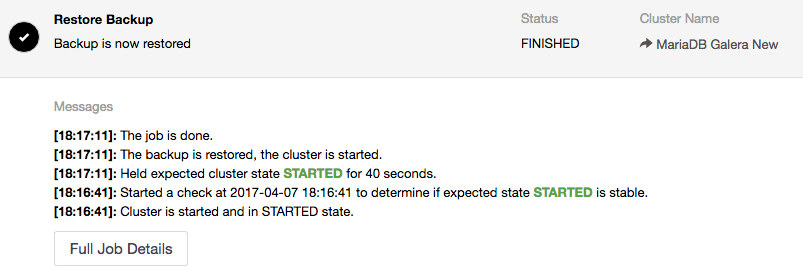
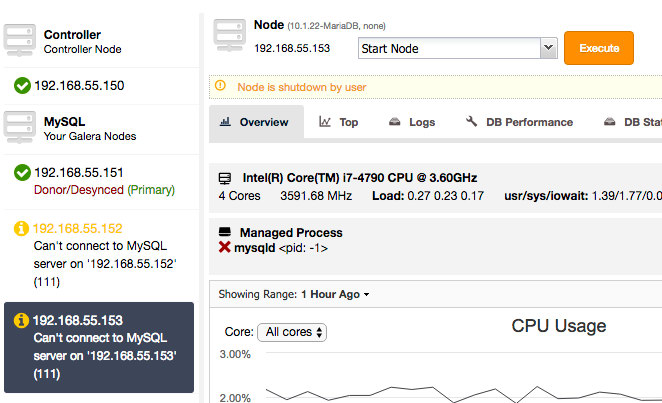
At this point, the target node is bootstrapped and running. We can start the remaining nodes under Nodes -> choose node -> Start Node and check the “Perform an Initial Start” checkbox:
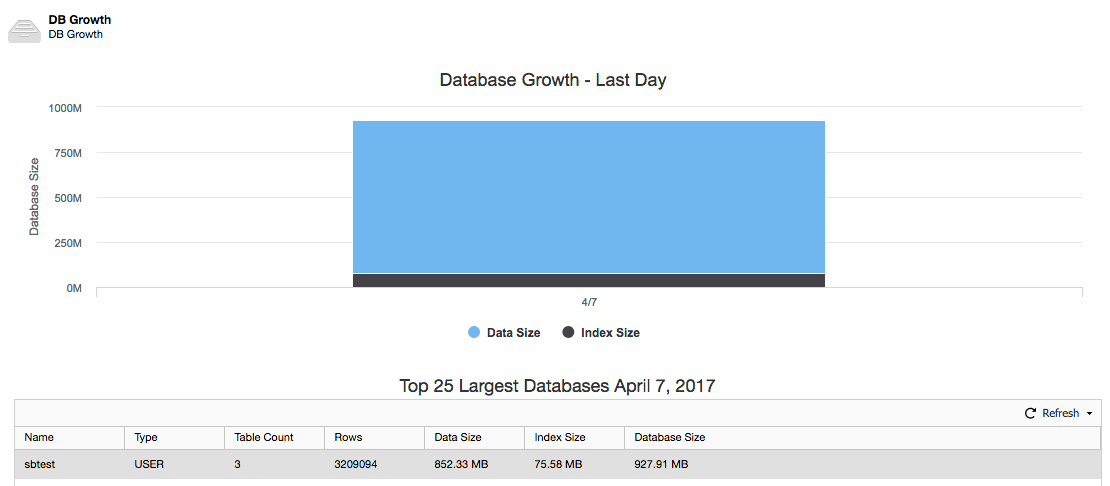
The restoration is now complete and you can expect Performance -> DB Growth to report the updated size of our newly restored data set :
Happy restoring!