blog
High Availability MySQL on cPanel with Galera Cluster

cPanel is a very popular Linux hosting control panel, used not only by hosting providers but also enterprise and goverment bodies. For large scale hosting environments hosting mission critical databases, how do you integrate cPanel with a high availability database?
![]()
In this blog post, we will show you how to integrate Percona XtraDB Cluster into cPanel to provide a high availability database hosting solution. By default, cPanel uses localhost to host the MySQL databases created by cPanel users. It is not uncommon to find MySQL to be the culprit when it comes to overloading the server. By having a remote MySQL server or cluster, we can offload some of the burden and increase the availability of other important services on the server.
Setting up a Galera cluster to integrate with cPanel requires you to meet the following requirements:
- skip-name-resolve must be turned OFF, as some cPanel services authenticate through hostname. Setting up correct host definitions in /etc/hosts is vital.
- MySQL tables should only use InnoDB. Some application installers like cpAddons (Site Software) and Softaculous create MyISAM tables in MySQL. These features should be used with extra precaution.
- The network infrastructure must support multicast or unicast to allow floating virtual IP address. This provides a single access point that can failover between load balancers.
- Before you set up a remote MySQL server, ensure that the remote server is able to resolve your local server’s hostname to its IP address. To confirm this, log into the remote server via SSH and use the host command.
- MySQL and Perl must already be installed on the remote server.
- You must be able to connect via SSH from this server’s IP address to the remote server.
- You must ensure the MySQL users create databases with the following criteria:
- Storage engine must be InnoDB only. Otherwise, the cluster might crash.
- All tables must have a primary key defined.
- Comply to Galera cluster limitations as described here.
- It’s preferable to let load balancers redirect queries to a single node, to reduce the chance of deadlocks and make it more predictable.
Take note that if you can’t meet the mentioned requirements, then this would be a risky attempt.
Our architecture is illustrated in the following diagram:
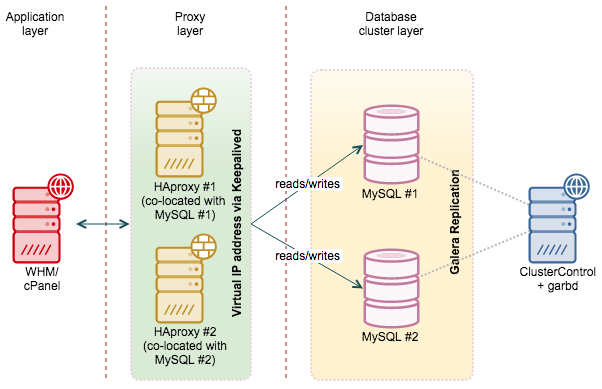
We assume you already have WHM installed. We will use the total of 4 nodes as per below:
- WHM – cpanel.domain.local – 192.168.1.200
- MySQL Galera Cluster #1 + HAproxy #1 + Keepalived – g1.domain.local – 192.168.1.211
- MySQL Galera Cluster #2 + HAproxy #2 + Keepalived – g2.domain.local – 192.168.1.212
- ClusterControl + Garbd – cc.domain.local -192.168.1.215
WHM will then connect through a virtual IP address floating on galera1 and galera2. This provides failover in case one of the DB nodes goes down. This setup allows only one node to be down at one particular time.
Prerequisites
1. Ensure all hosts have the following host definition inside /etc/hosts:
192.168.1.200     cpanel.domain.local cpanel
192.168.1.210     mysql.domain.local  mysql
192.168.1.211     mysql1.domain.local mysql1    lb1
192.168.1.212     mysql2.domain.local mysql2    lb2
192.168.1.215     cc.domain.local     cc        garbd
2. Ensure each host has proper FQDN set up as per host definition above. For example on cpanel server:
$ hostname -f
cpanel.domain.local
Deploying Galera Cluster for MySQL
1. To set up Galera Cluster, go to the Galera Configurator to generate a deployment package. In the wizard, we used the following values when configuring our database cluster (note that we specified one of the DB nodes twice under Database Servers’ text field) :
Vendor                 : Percona XtraDB Cluster
Infrastructure         : on-premise
Operating System       : RHEL6/CentOS6
Skip DNS Resolve       : No
Number of Galera Servers : 3 + 1
Max connections        : 200
OS user                : root
ClusterControl Server  : 192.168.1.215
Galera Servers         : 192.168.1.211 192.168.1.212 192.168.1.212
Follow the wizard, a deployment package will be generated and emailed to you.
2. Download and extract the deployment package:
$ wget https://severalnines.com/galera-configurator3/tmp/wb06357009915302877/s9s-galera-codership-3.5.0.tar.gz
$ tar -xzf s9s-galera-percona-3.5.0.tar.gz
3. Before we proceed with the deployment, we need to perform some customization when deploying a two-node Galera cluster. Go to ~/s9s-galera-percona-3.5.0/mysql/config/cmon.cnf.controller and remove the repeated node IP address next to mysql_server_addresses so it becomes as below:
mysql_server_addresses=192.168.1.211,192.168.1.212
4. Now we are ready to start the deployment:
$ cd ~/s9s-galera-percona-3.5.0/mysql/scripts/install/
$ bash ./deploy.sh 2>&1 | tee cc.log
5. The database cluster deployment will take about 15 minutes, and once completed, the ClusterControl UI is accessible at https://192.168.1.215/clustercontrol. Enter the default admin email address and password on the welcome page and you should be redirected to the ClusterControl UI dashboard.
6. It is recommended to run Galera on at least three nodes. So, install garbd, a lightweight arbitrator daemon for Galera on the ClusterControl node from the ClusterControl UI. Go to Manage > Load Balancer > Install Garbd > choose the ClusterControl node IP address from the dropdown > Install Garbd.
You will now see Galera Cluster with garbd installed as per below:

Deploying HAProxy and Keepalived
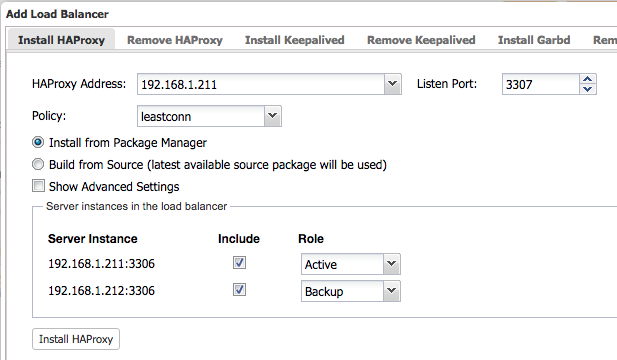
1. Deploy HAProxy on mysql1, 192.168.1.211. Go to ClusterControl > Manage > Load Balancer > Install HAProxy and include both MySQL nodes into the load balancing set with Active/Backup role.
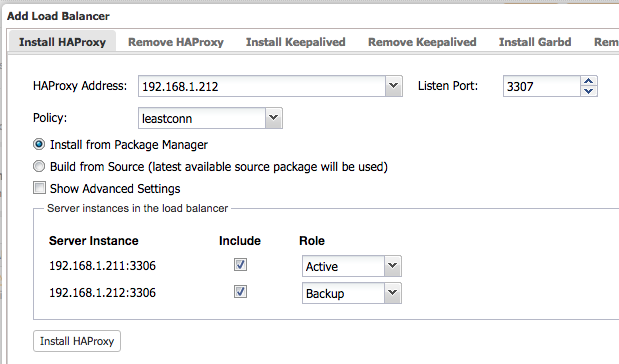
2. Deploy another HAProxy on mysql2, 192.168.1.212 with similar setup:
3. Once deployed, you should see the following statistics page if you go to ClusterControl > Nodes > select the HAProxy node:
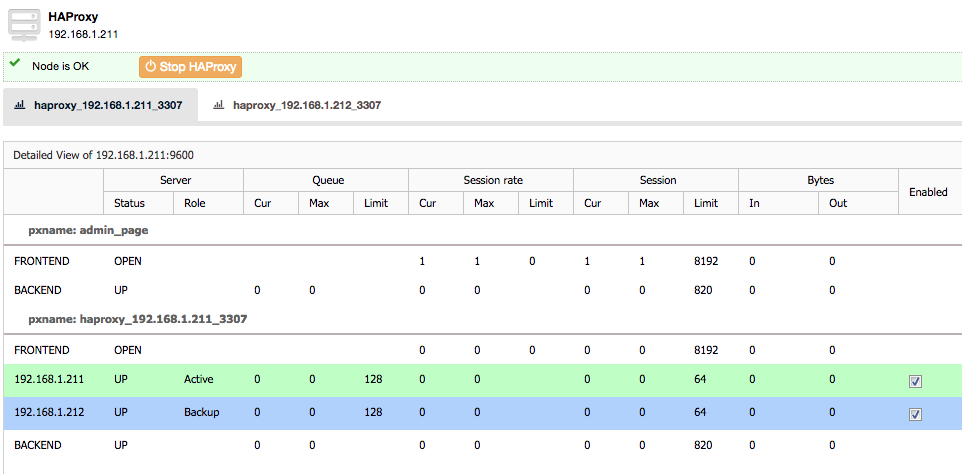
The green line indicates the MySQL server is up and active. All database requests through this HAProxy instance, port 3307 will be forwarded to mysql1 (192.168.1.211) unless it’s down, where mysql2 (192.168.1.212) will take over the active role. This means, we are not implementing multi-master writes in this setup.
4. We can now deploy Keepalived which requires 2 HAproxy instances. Go to ClusterControl > Manage > Load Balancer > Install Keepalived and specify the virtual IP address as per below:
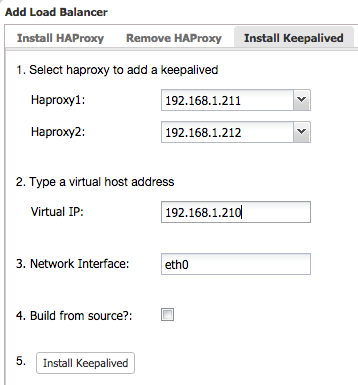
Now we are ready to integrate Galera Cluster into WHM/cPanel under Setup Remote MySQL Server feature. We will use the virtual IP address specified above as the remote MySQL endpoint for WHM/cPanel.
Integrating Galera Cluster with cPanel
1. cPanel requires a MySQL options file for user root located at /root/.my.cnf which defines the credentials of the remote MySQL server that we are going to use. On all nodes (Galera and cPanel nodes), create a file /root/.my.cnf and add the following lines:
[client]
username=root
password=[mysql root password]
host=192.168.1.210
port=3307
**Replace [mysql root password] with the respective value.
Verify that you can login to MySQL server just by typing the ‘mysql’ command as user root:
root@cpanel [~]$ mysql
Welcome to the MySQL monitor.  Commands end with ; or g.
Your MySQL connection id is 372
Server version: 5.6.24-72.2-56 Percona XtraDB Cluster (GPL), Release rel72.2, Revision 1, WSREP version 25.11, wsrep_25.11

Copyright (c) 2000, 2015, Oracle and/or its affiliates. All rights reserved.

Oracle is a registered trademark of Oracle Corporation and/or its
affiliates. Other names may be trademarks of their respective
owners.

Type 'help;' or 'h' for help. Type 'c' to clear the current input statement.
mysql>
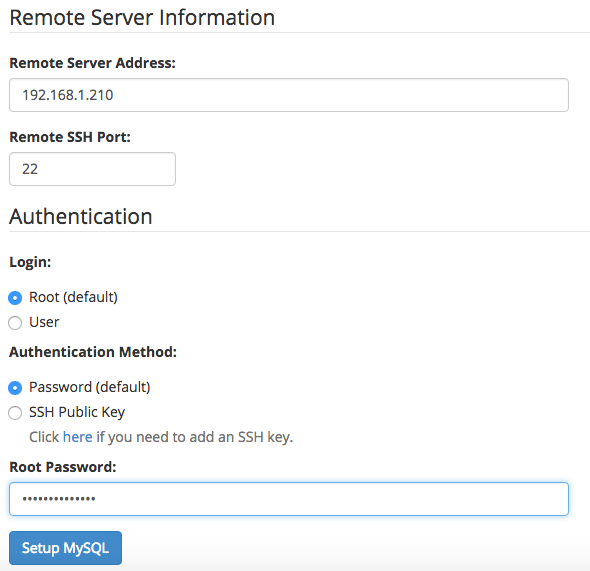
2. From WHM, go to WHM > SQL Services > Setup Remote MySQL Server and specify the virtual IP address of your MySQL Galera Cluster:
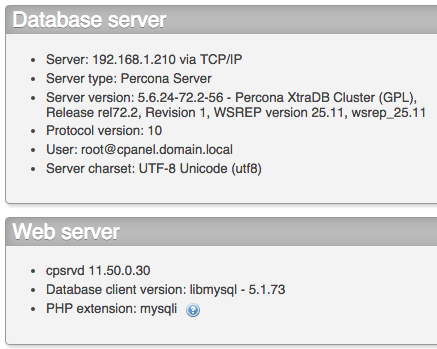
3. Once added, verify if WHM/cPanel connects to the correct database server by going to WHM > SQL Services > PHPmyAdmin and look into the information under Database Server section. You should see something similar to the screenshot below:
4. Now it’s safe to shutdown the local MySQL. Go to WHM > Service Configuration > Service Manager and uncheck the ‘Enabled’ and ‘Monitor’ tickboxes for MySQL Server. From this point, MySQL databases will be hosted on a high availability Galera Cluster with auto failover.
From cPanel, when you are trying to create a new database, it will display the MySQL server address under “Remote MySQL Host” section:
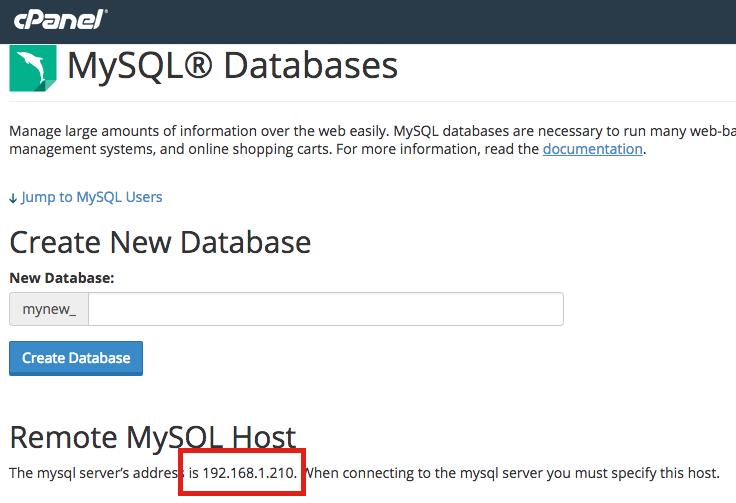
So, make sure you specify the highlighted host when connecting to the MySQL server from the application/client side. The setup is now complete.
Making cPanel fit into Galera
As a hoster, it is likely you will enable cPaddons or some third-party application installer like Fantastico or Softaculous to automate the installation of web applications from cPanel. Some of the applications still explicitly define MyISAM as the storage engine in the SQL files. MyISAM support in Galera is experimental, we would not recommend you run MyISAM tables in your production Galera Cluster.
In order to avoid this, we have to find and replace SQL files which contain MyISAM in the ENGINE statement. Run the following commands to achieve this for the cPaddons installer:
$ cd /usr/local/cpanel/cpaddons
$ sed -i 's|ENGINE=MyISAM|ENGINE=InnoDB|g' $(grep -lir "engine=MyISAM" *)
You can also use the mentioned command for other application installer. In case you upgrade cPanel or the installers, please make sure the engine has not been reverted back to MyISAM. That’s all folks!