blog
How to Perform an Online Upgrade of Galera Cluster to MySQL 5.6

Oracle released a GA version of MySQL 5.6 in February 2013, Codership released the first GA in their patched 5.6 series in November 2013. Galera Cluster for MySQL 5.6 has been around for almost 2 years now, so what are you waiting for? 🙂
Okay, this is a major upgrade so there are risks! Therefore, an upgrade must be carefully plan and tested. In this blog post, we’ll look into how to perform an online upgrade of your Galera Cluster (the Codership build of Galera) to MySQL 5.6.

Offline Upgrade
An offline upgrade requires downtime, but it is more straightforward. If you can afford a maintenance window, this is probably a safer way to reduce the risk of upgrade failures. The major steps consists of stopping the cluster, upgrading all nodes, bootstrap and starting the nodes. We covered the procedure in details in this blog post.
Online Upgrade
An online upgrade has to be done in rolling upgrade/restart fashion, i.e., upgrade one node at a time and then proceed to the next. During the upgrade, you will have a mix of MySQL 5.5. and 5.6. This can cause problems if not handled with care.
Here is the list that you need to check prior to the upgrade:
- Read and understand the changes with the new version
- Note the unsupported configuration options between the major versions
- Determine your cluster ID from the ClusterControl summary bar
- garbd nodes will also need to be upgraded
- All nodes must have internet connection
- SST must be avoided in the duration of upgrade so we must ensure each node’s gcache is appropriately configured and must be loaded prior to the upgrade.
- Some nodes will be read-only during the period of upgrade which means there will be some impact on the cluster’s write performance. Perform the upgrade during non-peak hours.
- The load balancer must be able to detect and exclude backend DB servers in read-only mode. Writes come from 5.6 are not compatible with 5.5 in a same cluster. Percona’s clustercheck and ClusterControl mysqlchk script should be able to handle this by default.
- If you are running on ClusterControl, ensure ClusterControl auto recovery feature is turned off to prevent ClusterControl recovering a node during its upgrade.
Here is what we’re going to do to perform the online upgrade:
- Set up Codership repository on all DB nodes.
- Increase gcache size and perform rolling restart.
- Backup all databases.
- Turn off ClusterControl auto recovery.
- Start the maintenance window.
- Upgrade packages in Db1 to 5.6.
- Add compatibility configuration options on my.cnf of Db1 (node will be read-only).
- Start Db1. At this point the cluster will consist MySQL 5.5 and 5.6 nodes. (Db1 is read-only, writes go to Db2 and Db3)
- Upgrade packages in Db2 to 5.6.
- Add compatibility configuration options on my.cnf of Db2 (node will be read-only).
- Start Db2. (Db1 and Db2 are read-only, writes go to Db3)
- Bring down Db3 so the read-only on upgraded nodes can be turned off (no more MySQL 5.5 at this point)
- Turn off read-only on Db1 and Db2. (Writes go to Db1 and Db2)
- Upgrade packages in Db3 to 5.6.
- Start Db3. At this point the cluster will consist of MySQL 5.6 nodes. (Writes go to Db1, Db2 and Db3)
- Clean up the compatibility options on all DB nodes.
- Verify nodes performance and availability.
- Turn on ClusterControl auto recovery.
- Close maintenance window
Upgrade Steps
In this example, we have three nodes MySQL Galera Cluster 5.5 (Codership) that we installed via the Severalnines Configurator running on CentOS 6 and Ubuntu 14.04. The steps performed here should work regardless if the cluster is deployed with or without ClusterControl. Omit sudo if you are running as root.
Preparation
1. MySQL 5.6 packages are available in the Codership package repository. We need to enable the repository on each of the DB nodes. You can find instructions for other operating systems here.
On CentOS 6, add the following lines into /etc/yum.repos.d/Codership.repo:
[codership]
name = Galera
baseurl = http://releases.galeracluster.com/centos/6/x86_64
gpgkey = http://releases.galeracluster.com/GPG-KEY-galeracluster.com
gpgcheck = 1
On Ubuntu 14.04:
$ sudo apt-key adv --keyserver keyserver.ubuntu.com --recv BC19DDBA
$ echo "deb http://releases.galeracluster.com/ubuntu trusty main" | sudo tee -a /etc/apt/sources.list
$ sudo apt-get update
2. Increase gcache size to a suitable amount. To be safe, increase the size so it can hold up to 1 to 2 hours downtime, as explained in this blog post under ‘Determining good gcache size’’section. In this example, we are going to increase the gcache size to 1GB. Open MySQL configuration file:
$ vim /etc/my.cnf # CentOS
$ sudo vim /etc/mysql/my.cnf # Ubuntu
Append or modify the following line under wsrep_provider_options:
wsrep_provider_options="gcache.size=1G"
Perform a rolling restart to apply the change. For ClusterControl users, you can use Manage > Upgrades > Rolling Restart.
3. Backup all databases. This is critical before performing any upgrade so you have something to fail back to if the upgrade fails. For ClusterControl users, you can use Backup > Start a Backup Immediately.
4. Turn off ClusterControl auto recovery from the UI, similar to screenshot below:

5. If you installed HAProxy through ClusterControl, there was a bug in previous versions in the health check script when detecting read-only node. Run the following command on all DB nodes to fix it (this is fixed in the latest version):
$ sudo sed -i 's/YES/ON/g' /usr/local/sbin/mysqlchk
Upgrading Database Server Db1 and Db2
1. Stop the MySQL service and remove the existing package. For Ubuntu/Debian, remove the symlink to MySQL 5.5 base directory which should be installed under /usr/local/mysql:
CentOS:
$ service mysql stop
$ yum remove MySQL-*
Ubuntu:
$ sudo service mysql stop
$ sudo rm -f /usr/local/mysql
IMPORTANT: As time is critical to avoid SST (in this post our gcache size can hold up to ~1 hour downtime without SST), you can download the packages directly from the repository before bringing down MySQL and then use local install command (yum localinstall or dpkg -i) instead to speed up the installation process. We have seen cases where the MySQL installation via package manager took a very long time due to slow connection to Codership’s repository.
2. Modify the MySQL configuration file for 5.6’s non-compatible option by commenting or removing the following line (if exists):
#engine-condition-pushdown=1
Then, append and modify the following lines for backward compatibility options:
[MYSQLD]
# new basedir installed with apt (Ubuntu/Debian only)
basedir=/usr

# Required for compatibility with galera-2
# Append socket.checksum=1 in wsrep_provider_options:
wsrep_provider_options="gcache.size=1G; socket.checksum=1"

# Required for replication compatibility
# Add following lines under [mysqld] directive:
log_bin_use_v1_row_events=1
binlog_checksum=NONE
gtid_mode=0
read_only=ON

[MYSQLD_SAFE]
# new basedir installed with apt (Ubuntu/Debian only)
basedir=/usr
3. Once configured, install the latest version via package manager:
CentOS:
$ yum install mysql-wsrep-server-5.6 mysql-wsrep-client-5.6
Ubuntu (also need to change the mysql client path in mysqlchk script):
$ sudo apt-get install mysql-wsrep-5.6
$ sudo sed -i 's|MYSQL_BIN=.*|MYSQL_BIN="/usr/bin/mysql"|g' /usr/local/sbin/mysqlchk
4. Start MySQL with skip grant and run mysql_upgrade script to upgrade system table:
$ sudo mysqld --skip-grant-tables --user=mysql --wsrep-provider='none' &
$ sudo mysql_upgrade -uroot -p
Make sure the last line returns ‘OK’, indicating the mysql_upgrade succeeded.
5. Gracefully kill the running mysqld process and start the server:
$ sudo killall -15 mysqld
$ sudo service mysql start
Monitor the MySQL error log and ensure the node joins through IST, similar to below:
2015-08-14 16:56:12 89049 [Note] WSREP: Signalling provider to continue.
2015-08-14 16:56:12 89049 [Note] WSREP: inited wsrep sidno 1
2015-08-14 16:56:12 89049 [Note] WSREP: SST received: 82f872f9-4188-11e5-aa6b-2ab795bec872:46229
2015-08-14 16:56:12 89049 [Note] WSREP: Receiving IST: 49699 writesets, seqnos 46229-95928
2015-08-14 16:56:12 89049 [Note] /usr/sbin/mysqld: ready for connections.
Version: '5.6.23'  socket: '/var/lib/mysql/mysql.sock'  port: 3306  MySQL Community Server (GPL), wsrep_25.10
2015-08-14 16:56:20 89049 [Note] WSREP: 0 (192.168.55.139): State transfer to 1 (192.168.55.140) complete.
2015-08-14 16:56:20 89049 [Note] WSREP: IST received: 82f872f9-4188-11e5-aa6b-2ab795bec872:95928
2015-08-14 16:56:20 89049 [Note] WSREP: Member 0 (192.168.55.139) synced with group.
2015-08-14 16:56:20 89049 [Note] WSREP: 1 (192.168.55.140): State transfer from 0 (192.168.55.139) complete.
2015-08-14 16:56:20 89049 [Note] WSREP: Shifting JOINER -> JOINED (TO: 97760)
2015-08-14 16:56:20 89049 [Note] WSREP: Member 1 (192.168.55.140) synced with group.
2015-08-14 16:56:20 89049 [Note] WSREP: Shifting JOINED -> SYNCED (TO: 97815)
2015-08-14 16:56:20 89049 [Note] WSREP: Synchronized with group, ready for connections
Repeat the same step for the second node. Once upgrade is completed on Db1 and Db2, you should notice that writes are now redirected to Db3, which is still running on MySQL 5.5:
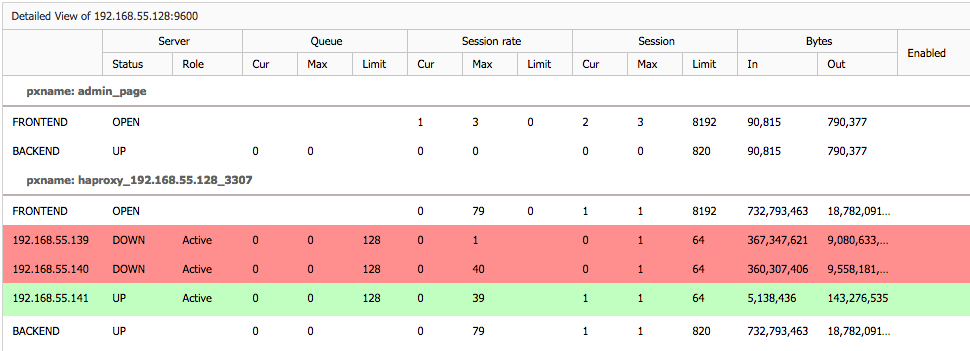
This doesn’t mean that both upgraded MySQL servers are down, they are just set to be read-only to prevent writes coming from 5.6 being replicated to 5.5 (which is not supported). We will switch the writes over just before we start the upgrade of the last node.
Upgrading the Last Database Server (Db3)
1. Stop MySQL service on Db3:
$ sudo service mysql stop
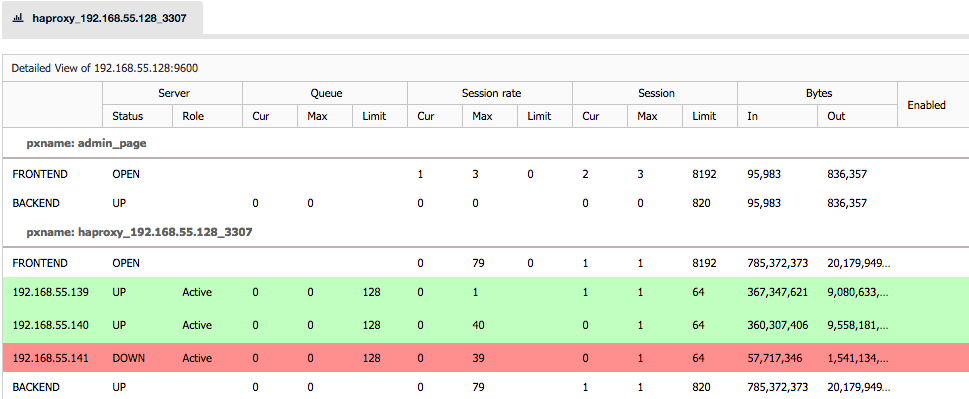
2. Turn off read-only on Db1 and Db2 so they can start to receive writes. From this point, writes will go to MySQL 5.6 only. On Db1 and Db2, run the following statement:
$ mysql -uroot -p -e 'SET GLOBAL read_only = OFF'
Verify that you see something like below on the HAProxy statistic page (ClusterControl > Nodes > select HAproxy node), indicating Db1 and Db2 are now up and active:
4. Modify the MySQL configuration file for 5.6’s non-compatible option by commenting or removing the following line (if exists):
#engine-condition-pushdown=1
Then, modify the following lines for the new basedir path (Ubuntu/Debian only):
[MYSQLD]
# new basedir installed with apt (Ubuntu/Debian only)
basedir=/usr

[MYSQLD_SAFE]
# new basedir installed with apt (Ubuntu/Debian only)
basedir=/usr
** There is no need to enable backward compatibility options anymore since the other nodes (Db1 and Db2) are already in 5.6.
3. Now we can proceed with the upgrade on Db3:
CentOS:
$ yum remove MySQL-*
$ yum install mysql-wsrep-server-5.6 mysql-wsrep-client-5.6
Ubuntu (also need to change the mysql client path in mysqlchk script):
$ sudo rm -f /usr/local/mysql
$ sudo apt-get install mysql-wsrep-5.6
$ sudo sed -i 's|MYSQL_BIN=.*|MYSQL_BIN="/usr/bin/mysql"|g' /usr/local/sbin/mysqlchk
5. Start MySQL with skip grant and run mysql_upgrade script to upgrade system tables:
$ sudo mysqld --skip-grant-tables --user=mysql --wsrep-provider='none' &
$ sudo mysql_upgrade -uroot -p
Make sure the last line returns ‘OK’, indicating the mysql_upgrade succeeded.
6. Gracefully kill the running mysqld process and start the server:
$ sudo killall -15 mysqld
$ sudo service mysql start
Wait until the last node joins the cluster and verify the status and version from the ClusterControl Overview tab:

That’s it. Your cluster is upgraded to 5.6. Next, we need to perform some cleanups.
Cleaning Up
1. Fetch the new configuration file contents into ClusterControl by going to ClusterControl > Manage > Configurations > Reimport Configuration.
2. Remove the backward compatibility option on Db1 and Db2 by modifying the following lines:
# Remove socket.checksum=1 in wsrep_provider_options:
wsrep_provider_options="gcache.size=1G"

# Remove or comment following lines:
#log_bin_use_v1_row_events=1
#gtid_mode=0
#binlog_checksum=NONE
#read_only=ON
Restart Db1 and Db2 (one node at a time) to immediately apply the changes.
3. Enable ClusterControl automatic recovery:

4. In some occasions, you might see “undefined()” appearing in Overview page. This is due to a ClusterControl bug in previous versions on detecting a new node. To reset the node status, perform the following command on ClusterControl node:
$ sudo service cmon stop
$ mysql -uroot -p -e 'truncate cmon.server_node'
$ sudo service cmon start
Take note that the upgrade preparation part could take a long time if you have a huge dataset to backup. The upgrading process (excluding preparation) took us approximately 45 minutes to complete. For MariaDB users, we will cover online upgrade to MariaDB Cluster 10 in an upcoming post. Stay tuned!
References
- Percona XtraDB Cluster In-Place Upgrading Guide: From 5.5 to 5.6 – https://www.percona.com/doc/percona-xtradb-cluster/5.6/upgrading_guide_55_56.html
- Binary installation – http://galeracluster.com/documentation-webpages/installmysql.html