blog
OpenStack Metering: How to Install Ceilometer with MongoDB

According to Wikipedia, a ceilometer is a device that uses a laser or other light source to determine the height of a cloud base. And it is also the name of the framework for monitoring and metering OpenStack. It collects measurements within OpenStack so that no two agents would need to be written to collect the same data.
Ceilometer collects metering data (CPU, network costs) that can be used for billing purposes with Openstack. Because it requires a lot of writes, the preferred database is MongoDB. Although there are drivers for other database backends, the storage driver for MongoDB is considered feature-complete at this time and therefore recommended for production usage.
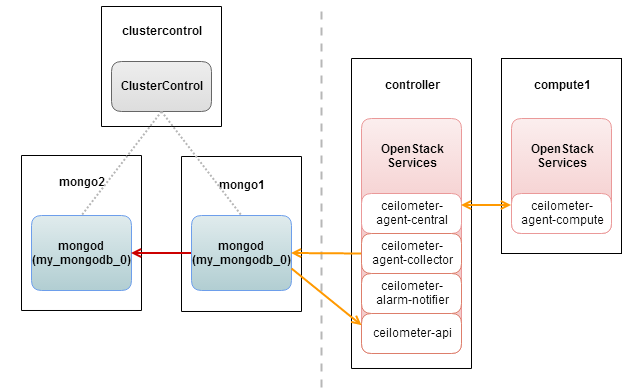
In this post we are going to show you how to deploy a minimal MongoDB replica set (two MongoDB instances) and install Ceilometer services on OpenStack’s controller and compute nodes. This example assumes that we already have an OpenStack controller and a compute node running on Ubuntu Precise with three additional nodes specifically for MongoDB and ClusterControl.
Our architecture is illustrated as follows:
Our hosts definitions on every hosts are as below:
192.168.10.101	controller
192.168.10.102	compute1
192.168.10.110	clustercontrol
192.168.10.111	mongo1
192.168.10.112	mongo2
Deploying MongoDB Replica Set
- We will use the MongoDB Configurator to deploy a Replica Set consisting of two MongoDB instances. The following options have been used for the deployment package:
Configuration : Single Replicaset Vendor : 10gen Number of mongod in each replica set: 2 mongod OS user : Ubuntu Use ‘smallfiles’ : yes ClusterControl server: 192.168.197.110 Mongo Servers : 1) 192.168.197.111 2) 192.168.197.112 - Download the deployment package into the ClusterControl node and start the deployment:
$ wget https://severalnines.com/mongodb-configurator/tmp/cuqoedm36jncj1udjqrn6avuh6/s9s-mongodb-10gen-1.0.0.tar.gz $ tar -xzf s9s-mongodb-10gen-1.0.0.tar.gz $ cd s9s-mongodb-10gen-1.0.0/mongodb/scripts/install/ $ bash ./deploy.sh 2>&1 | tee cc.log - Once the deployment is complete, register the MongoDB Replica Set with ClusterControl UI. Open http://192.168.197.110/cmonapi and enter the API token and CMONAPI URL. Once registered, you should see a mongodb database appears in the UI dashboard page, similar to screenshot below:

The database platform is ready and we can now proceed to install Ceilometer services.
Note: You might also consider to add a MongoDB arbiter to your Replica Set to maintain reliable quorum. For instance, to deploy an arbiter on the ClusterControl Server, make sure to install MongoDB server packages beforehand and use following command to add the arbiter into the current replica set from the ClusterControl node:
$ sudo s9s_mongodb_admin --add-arbiter -i 1 -N my_mongodb_0 -h 192.168.197.110 -P 30000 -d /var/lib/mongodbOnce done, the arbiter node should listed under Nodes page:

Installing Ceilometer
Controller Node
- Add MongoDB repository into /etc/apt/sources.list:
$ echo “deb http://downloads-distro.mongodb.org/repo/ubuntu-upstart dist 10gen” | sudo tee -a /etc/apt/sources.list - Install Ceilometer services and mongodb-clients on the OpenStack controller node:
$ sudo apt-get install ceilometer-api ceilometer-collector ceilometer-agent-central python-ceilometerclient mongodb-clients - Edit the connection string to use mongodb in /etc/ceilometer/ceilometer.conf under [database] section. Make sure you specify the PRIMARY mongod instance (as in this case is mongo1):
[database] connection=mongodb://ceilometer:ceilometerpassword@mongo1:27017/ceilometer - Generate a shared secret key:
$ openssl rand -hex 10
73e3bcb910df888c11e1
And replace the value for metering_secret under [publisher_rpc] section in /etc/ceilometer/ceilometer.conf:
[publisher_rpc] metering_secret=73e3bcb910df888c11e1 - Create a ceilometer user to authenticate with Keystone. Use the service tenant and assign user with admin role:
$ keystone user-create --name=ceilometer --pass=ceilometerpassword [email protected] $ keystone user-role-add --user=ceilometer --tenant=service --role=admin - Define the Keystone authentication token at /etc/ceilometer/ceilometer.conf by adding the following lines under the [keystone_authtoken] section:
[keystone_authtoken] auth_host = controller auth_uri = http://controller:35357/v2.0 auth_protocol = http admin_tenant_name = service admin_user = ceilometer admin_password = ceilometerpassword - Register the ceilometer service with Keystone and take note of the id generated as we will need it in the next step:
$ keystone service-create --name=ceilometer --type=metering --description="Ceilometer Metering Service" +-------------+----------------------------------+ | Property | Value | +-------------+----------------------------------+ | description | Ceilometer Metering Service | | id | 8a6d406fe08042d5a1ac5793dc46fc69 | | name | ceilometer | | type | metering | +-------------+----------------------------------+ - Create the endpoint for ceilometer services. Use the –service-id value generated in the previous command:
$ keystone endpoint-create --service-id=8a6d406fe08042d5a1ac5793dc46fc69 --publicurl=http://controller:8777/ --internalurl=http://controller:8777/ --adminurl=http://controller:8777/ - Let’s create a mongodb database and user for ceilometer. Firstly connect to mongo1 using the mongo client:
$ mongo --host mongo1And execute following queries:
my_mongodb_0:PRIMARY> use ceilometer my_mongodb_0:PRIMARY> db.addUser ( { user: "ceilometer", pwd: "ceilometerpassword" , roles: [ "readWrite", "dbAdmin" ] } ) - Restart ceilometer services:
$ sudo service ceilometer-agent-central restart
$ sudo service ceilometer-api restart
$ sudo service ceilometer-collector restart
Compute Node
- In this example, we just have a compute node used to run instances. So we are going to install the ceilometer agent package for nova compute. To add other service agents for metering services, please refer to Havana documentation:
$ sudo apt-get install ceilometer-agent-compute - Configure Nova with metering services by adding the following lines into /etc/nova/nova.conf under [default] section:
instance_usage_audit=True instance_usage_audit_period=hour notify_on_state_change=vm_and_task_state notification_driver=nova.openstack.common.notifier.rpc_notifier notification_driver=ceilometer.compute.nova_notifier - Add the same shared secret key into /etc/ceilometer/ceilometer.conf:
[publisher_rpc] metering_secret=73e3bcb910df888c11e1 - Restart ceilometer-agent and nova-compute:
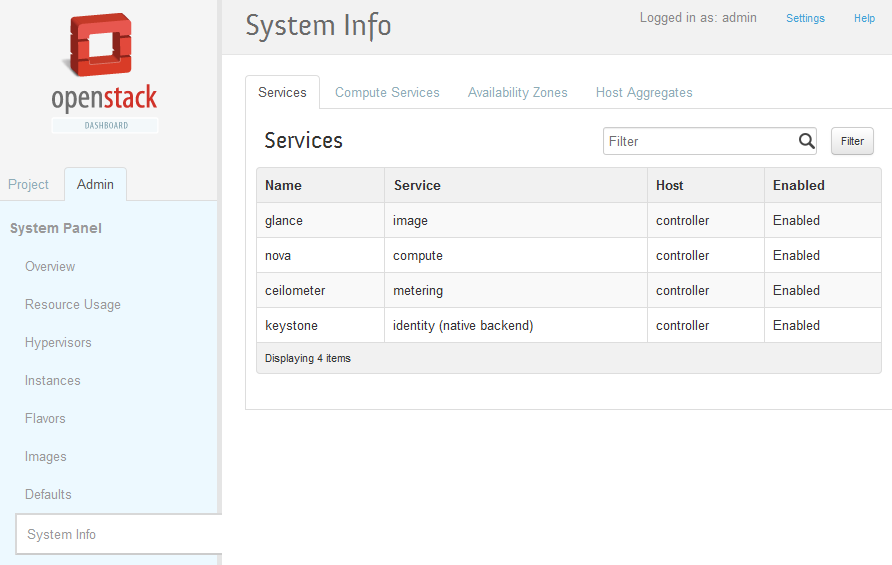
$ sudo service ceilometer-agent-compute restart
$ sudo service nova-compute restart
Log into the Horizon dashboard and you should able to see ceilometer has been enabled under System Info:
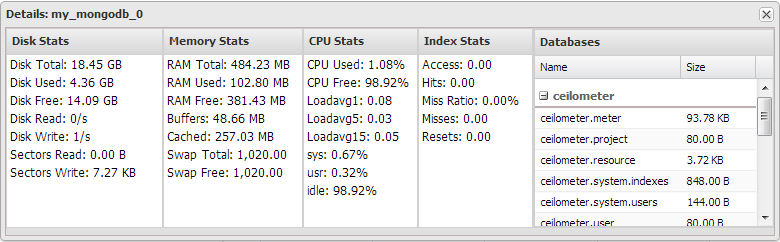
After a few minutes, verify that the Ceilometer services have started to insert data into the ceilometer database. The following summary can be retrieved from ClusterControl’s Overview page:
Deploying Ceilometer with MongoDB Sharded Cluster
As your OpenStack infrastructure expands, expect metering collections and your MongoDB dataset to grow. You should then look into moving your Replica Set to a Sharded Cluster topology. There are several ways to achieve this, either convert the Replica Set to a Sharded Cluster or manually export the data set to a new MongoDB Sharded Cluster. You can easily deploy a Sharded Cluster using the MongoDB Configurator.
References
- OpenStack Installation Guide for Ubuntu 12.04 (LTS) – http://docs.openstack.org/havana/install-guide/install/apt/content/
- OpenStack Configuration Reference – http://docs.openstack.org/havana/config-reference/content/
- Ceilometer System Architecture – http://docs.openstack.org/developer/ceilometer/architecture.html


