blog
Scaling Drupal on Multiple Servers with Galera Cluster for MySQL

This post shows you how to move from a single instance Drupal/MySQL to a multi-server environment. A well designed multi-server deployment not only allows Drupal to scale, but will also enhance redundancy by removing single points of failure. Components used are Apache, PHP, csync2, lsyncd, Keepalived, HAproxy, MySQL Galera Cluster and ClusterControl.
![]()
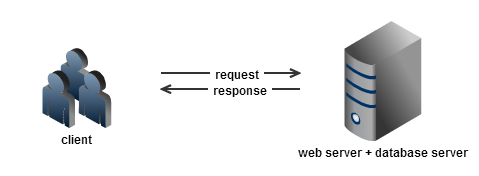
Our starting point is a single server deployment of Drupal:
Our goal is to design and implement a scalable high availability architecture for our Drupal site. The new setup consists of 5 nodes or servers:
- node1: web server + database server
- node2: web server + database server
- node3: web server + database server
- lb1: ClusterControl + load balancer (master)
- lb2: load balancer (backup)
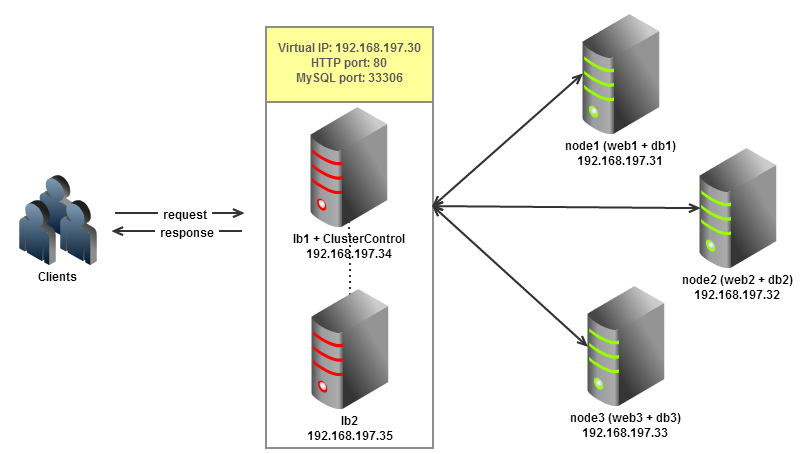
Hosts lb1 and lb2 will be sharing a virtual IP to allow IP failover for the load balancer. Once ready, we will migrate our Drupal web contents and database into the new setup. All nodes are using RHEL 6 based distribution with x86_64 architecture.
We will automate the deployment of MySQL Galera Cluster by using the Galera Configurator. The tricky part is the file system clustering where we need to sync our web contents on all nodes in our web server farm, so they can serve the same content. In this case, we will use csync2 with lsyncd as the basis for file system clustering, and keep files on multiple hosts in the cluster in sync. Csync2 can handle complex setups with much more than just 2 hosts, handle file deletions and can detect conflicts.
Our major steps would be:
- Prepare 5 servers
- Deploy MySQL with Galera Cluster into node1, node2 and node3 from lb1
- Setup Apache in node1, node2 and node3
- Setup csync2 and lsyncd in node1, node2 and node3 so the web contents can be automatically replicated
- Setup keepalived and HAProxy for load balancing with auto failover
- Migrate Drupal web content and database from the single instance to the new clustered setup
Preparing Hosts
1. Turn off firewall and SElinux on all hosts to simplify the deployment:
$ chkconfig iptables off
$ service iptables stop
$ sed -i.bak 's#SELINUX=enforcing#SELINUX=disabled#g' /etc/selinux/config
$ setenforce 0
2. Define the hosts in /etc/hosts and set up passwordless SSH between the hosts. Here is our hosts definition in /etc/hosts:
192.168.197.30 www.mywebsite.com mysql.mywebsite.com #virtual IP 192.168.197.31 node1 web1 db1 192.168.197.32 node2 web2 db2 192.168.197.33 node3 web3 db3 192.168.197.34 lb1 clustercontrol 192.168.197.35 lb2 sharedanceDeploy MySQL Galera Cluster
1. Generate a Galera deployment package by using the ClusterControl deployment wizard. Use the following IP addresses in the configuration wizard:
ClusterControl Server: 192.168.197.34
Server #1: 192.168.197.31
Server #2: 192.168.197.32
Server #3: 192.168.197.33
At the end, a deployment package will be generated and emailed to you.
2. Login into lb1 which will be co-located with the ClusterControl server, download the script and start the database cluster deployment:
$ wget https://severalnines.com/galera-configurator/tmp/f43ssh1mmth37o1nv8vf58jdg6/s9s-galera-2.2.0-rpm.tar.gz
$ tar xvfz s9s-galera-2.2.0-rpm.tar.gz
$ cd s9s-galera-2.2.0-rpm/mysql/scripts/install
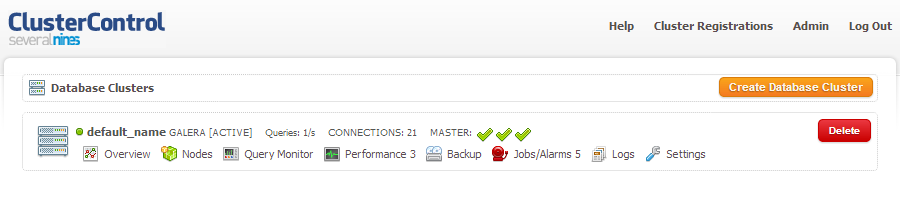
$ bash ./deploy.sh 2>&1 | tee cc.log3. Once the deployment is completed, note your API key. Use it to register the cluster with the ClusterControl UI by going to http://192.168.197.34/cmonapi. You will now be able to view your Galera Cluster in the UI:
Configure Apache
1. Login to node1, node2 and node3 to install Apache using the package manager (yum/apt). We will NOT using php-mysql package because it could cause conflicts with our MySQL Galera. Alternatively, we will use php-mysqlnd package which is available under atomicorp yum repository:
$ wget -q -O - http://www.atomicorp.com/installers/atomic | sh
$ yum install httpd php php-pdo php-gd php-xml php-mbstring php-mysqlnd ImageMagick mailutils sendmail -y
2. Create the required directories for the website. We will put our Drupal web content under the public_html directory, Apache error and access log under logs directory:
$ mkdir -p /home/website/public_html
$ mkdir -p /home/website/logs
3. Create the required log files:
$ touch /home/website/logs/error_log
$ touch /home/website/logs/access_log
4. Create a new configuration file for website under /etc/httpd/conf.d/:
$ vim /etc/httpd/conf.d/website.confAnd add the following:
NameVirtualHost *:80

    ServerName mywebsite.com
    ServerAlias www.mywebsite.com
    ServerAdmin [email protected]
    DocumentRoot /home/website/public_html
    ErrorLog /home/website/logs/error_log
    CustomLog /home/website/logs/access_log combined
5. Enable Apache on boot and start the service:
$ chkconfig httpd on
$ service httpd start
Configuring File Replication
1. Download and install csync2 and lsyncd which is available under EPEL repository:
$ rpm -Uhv http://dl.fedoraproject.org/pub/epel/6/x86_64/epel-release-6-8.noarch.rpm
$ yum install csync2 lsyncd
Configure csync2
1. Enable csync2 service under xinetd directory and start xinetd:
$ sed -i.bak 's#yes#no#g' /etc/xinetd.d/csync2
$ service xinetd start
2. Login to node1 and generate csync2 group key:
$ csync2 -k /etc/csync2/csync2.key3. Configure csync2 by adding following line into /etc/csync2/csync2.cfg:
## configuration for /etc/csync2/csync2.cfg
nossl * *;
group web
{
        host node1;
        host (node2);
        host (node3);
        key /etc/csync2/csync2.key;
        include /home/website/public_html;
        exclude *.log;
        auto younger;
}
4. Copy the content inside /etc/csync2 directory to the other nodes:
$ scp /etc/csync2/* node2:/etc/csync2
$ scp /etc/csync2/* node3:/etc/csync3
5. Initiate the csync2 replication by running the following command in node1, node2 and node3:
$ csync2 -xv**Notes: You may get ‘host is not a member of any configured group’ error if you are using hostname other than node1. Ensure your host definition in /etc/hosts and hostname are match and properly configured.
6. Based on this very good post from Floren, we will use his recommended method on replicating files and directories by creating several csync2 configuration files to describe each node’s replication behaviour. Create a configuration for each node with “csync2_” prefix. On node1, create individual node configuration file as example below:
## configuration for /etc/csync2/csync2_node1.cfg
nossl * *;
group web
{
        host node1;
        host (node2);
        host (node3);
        key /etc/csync2/csync2.key;
        include /home/website/public_html;
        exclude *.log;
        auto younger;
}
## configuration for /etc/csync2/csync2_node2.cfg
nossl * *;
group web
{
        host (node1);
        host node2;
        host (node3);
        key /etc/csync2/csync2.key;
        include /home/website/public_html;
        exclude *.log;
        auto younger;
}
## configuration for /etc/csync2/csync2_node3.cfg
nossl * *;
group web
{
        host (node1);
        host (node2);
        host node3;
        key /etc/csync2/csync2.key;
        include /home/website/public_html;
        exclude *.log;
        auto younger;
}
7. Copy again the content inside /etc/csync2 directory to the other nodes:
$ scp /etc/csync2/* node2:/etc/csync2
$ scp /etc/csync2/* node3:/etc/csync2
Configure lsyncd
1. Configure lsyncd by adding the following line at /etc/lsyncd.conf:
settings {
        logident        = "lsyncd",
        logfacility     = "user",
        logfile         = "/var/log/lsyncd.log",
        statusFile      = "/var/log/lsyncd_status.log",
        statusInterval  = 1
}
initSync = {
        delay = 1,
        maxProcesses = 1,
        action = function(inlet)
                local config = inlet.getConfig()
                local elist = inlet.getEvents(function(event)
                        return event.etype ~= "Init"
                end)
                local directory = string.sub(config.source, 1, -2)
                local paths = elist.getPaths(function(etype, path)
                        return "t" .. config.syncid .. ":" .. directory .. path
                end)
                log("Normal", "Processing syncing list:n", table.concat(paths, "n"))
                spawn(elist, "/usr/sbin/csync2", "-C", config.syncid, "-x")
        end,
        collect = function(agent, exitcode)
                local config = agent.config
                if not agent.isList and agent.etype == "Init" then
                        if exitcode == 0 then
                                log("Normal", "Startup of '", config.syncid, "' instance finished.")
                        elseif config.exitcodes and config.exitcodes[exitcode] == "again" then
                                log("Normal", "Retrying startup of '", config.syncid, "' instance.")
                                return "again"
                        else
                                log("Error", "Failure on startup of '", config.syncid, "' instance.")
                                terminate(-1)
                        end
                        return
                end
                local rc = config.exitcodes and config.exitcodes[exitcode]
                if rc == "die" then
                        return rc
                end
                if agent.isList then
                        if rc == "again" then
                                log("Normal", "Retrying events list on exitcode = ", exitcode)
                        else
                                log("Normal", "Finished events list = ", exitcode)
                        end
                else
                        if rc == "again" then
                                log("Normal", "Retrying ", agent.etype, " on ", agent.sourcePath, " = ", exitcode)
                        else
                                log("Normal", "Finished ", agent.etype, " on ", agent.sourcePath, " = ", exitcode)
                        end
                end
                return rc
        end,
        init = function(event)
                local inlet = event.inlet;
                local config = inlet.getConfig();
                log("Normal", "Recursive startup sync: ", config.syncid, ":", config.source)
                spawn(event, "/usr/sbin/csync2", "-C", config.syncid, "-x")
        end,
        prepare = function(config)
                if not config.syncid then
                        error("Missing 'syncid' parameter.", 4)
                end
                local c = "csync2_" .. config.syncid .. ".cfg"
                local f, err = io.open("/etc/csync2/" .. c, "r")
                if not f then
                        error("Invalid 'syncid' parameter: " .. err, 4)
                end
                f:close()
        end
}
local sources = {
        -- change the node1 value with respective host
        ["/home/website/public_html"] = "node1"
}
for key, value in pairs(sources) do
        sync {initSync, source=key, syncid=value}
end
** Do not forget to change “node1” in the respective node. For example in node2, lsyncd’s ‘local source’ definition should use “node2”.
2. Add the configuration path to lsyncd option under /etc/sysconfig/lsyncd:
$ sed -i.bak 's#^LSYNCD_OPTIONS=.*#LSYNCD_OPTIONS=" /etc/lsyncd.conf"#g' /etc/sysconfig/lsyncd3. Enable lsyncd on boot and start the service:
$ chkconfig lsyncd on
$ service lsyncd start
Load Balancing and Failover
Install HAproxy
1. We have deploy scripts for HAproxy in our Git repository https://github.com/severalnines/s9s-admin. Login to the ClusterControl node (lb1) to perform this installation. Navigate to the install directory from where you deployed the database cluster, and clone the repo:
$ cd /root/s9s-galera-2.2.0/mysql/scripts/install
$ git clone https://github.com/severalnines/s9s-admin.git
2. Before we start to deploy, make sure lb1 and lb2 are accessible using passwordless SSH. Copy the SSH keys to the load balancer nodes:
$ ssh-copy-id -i ~/.ssh/id_rsa 192.168.197.34
$ ssh-copy-id -i ~/.ssh/id_rsa 192.168.197.35
3. Since HAproxy and ClusterControl are co-located on one server, we need to change the Apache default port to another port, for example port 8080. ClusterControl will run on port 8080 while HAproxy taking over port 80 to perform web load balancing. Open Apache configuration file at /etc/httpd/conf/httpd.conf and make changes on the following directive:
Listen 80804. Restart Apache to apply the changes:
$ service httpd restart** Take note that the ClusterControl address has changed to port 8080 from now onwards.
5. Install HAproxy on both nodes:
$ ./s9s-admin/cluster/s9s_haproxy --install -i 1 -h 192.168.197.34
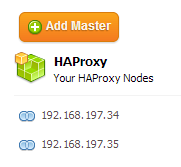
$ ./s9s-admin/cluster/s9s_haproxy --install -i 1 -h 192.168.197.356. The 2 load balancer nodes have now been installed, and are integrated with ClusterControl. You can verify this by checking out the Nodes tab in the ClusterControl UI:
Configure HAproxy for Apache Load Balancing
1. By default, our script will configure the MySQL reverse proxy service to listen on port 33306. We will need to add a few more lines to tell HAproxy to load balance our web server farm as well. Add following line in /etc/haproxy/haproxy.cfg:
frontend http-in
    bind *:80
    default_backend web_farm

backend web_farm
    server node1 192.168.197.31:80 maxconn 32
    server node2 192.168.197.32:80 maxconn 32
    server node3 192.168.197.33:80 maxconn 32
2. Restart HAproxy service:
$ killall haproxy
$ /usr/sbin/haproxy -f /etc/haproxy/haproxy.cfg -p /var/run/haproxy.pid -st `cat /var/run/haproxy.pid`
Install Keepalived
The following steps should be performed on lb1 and lb2.
1. Install Keepalived package:
$ yum install -y keepalived
$ chkconfig keepalived on
2. Tell the kernel to allow binding of non-local IP into the hosts and apply the changes:
$ echo "net.ipv4.ip_nonlocal_bind = 1" >> /etc/sysctl.conf
$ sysctl -p
Configure Keepalived and Virtual IP
1. Login to lb1 and add the following into /etc/keepalived/keepalived.conf:
vrrp_script chk_haproxy {
   script "killall -0 haproxy"   # verify the pid existance
   interval 2                    # check every 2 seconds
   weight 2                      # add 2 points of prio if OK
}

vrrp_instance VI_1 {
   interface eth0                # interface to monitor
   state MASTER
   virtual_router_id 51          # Assign one ID for this route
   priority 101                  # 101 on master, 100 on backup
   virtual_ipaddress {
       192.168.197.30            # the virtual IP
   }
   track_script {
       chk_haproxy
   }
}
2. Login into lb2 and add the following into /etc/keepalived/keepalived.conf:
vrrp_script chk_haproxy {
   script "killall -0 haproxy"   # verify the pid existance
   interval 2                    # check every 2 seconds
   weight 2                      # add 2 points of prio if OK
}

vrrp_instance VI_1 {
   interface eth0                # interface to monitor
   state MASTER
   virtual_router_id 51          # Assign one ID for this route
   priority 100                  # 101 on master, 100 on backup
   virtual_ipaddress {
       192.168.197.30            # the virtual IP
   }
   track_script {
       chk_haproxy
   }
}
3. Start Keepalived in both nodes:
$ chkconfig keepalived on
$ service keepalived start
Data Migration
Exporting Data
1. Login into the old server and export the MySQL database:
$ mysqldump -ublog_user -p’blogpassword’ drupal_blog > drupal_blog.sql2. Copy the sqldump file into one of the web servers, for example node2:
$ scp drupal_blog.sql root@node2:~Importing Data
1. Login to node1, and create a new schema for the blog:
$ mysql -uroot -h127.0.0.1 -p -e ‘CREATE DATABASE drupal_blog’2. Grant the database user access which will coming through load balancer host:
> GRANT ALL PRIVILEGES ON drupal_blog.* TO ‘blog_user’@’192.168.197.34’ IDENTIFIED BY ‘blogpassword’;
> GRANT ALL PRIVILEGES ON drupal_blog.* TO ‘blog_user’@’192.168.197.35’ IDENTIFIED BY ‘blogpassword;
> GRANT ALL PRIVILEGES ON drupal_blog.* TO ‘blog_user’@’127.0.0.1’ IDENTIFIED BY ‘blogpassword;
3. Import the old schema:
$ mysql -ublog_user -p drupal_blog < /root/drupal_blog.sql4. Web files migration is as simple as copying over your existing Drupal web contents using remote copy:
$ scp -r root@old_node:/var/www/html/blog /home/website/public_html5. Set correct ownership to the web files:
$ chown apache.apache /home/website/public_html/blog -Rf6. Change the Drupal setting to meet the new setup at /home/website/public_html/blog/sites/default/settings.php:
'database' => 'drupal_blog',
      'username' => 'blog_user',
      'password' => 'blogpassword',
      'host' => 'mysql.mywebsite.com', //or VIP address
      'port' => '33306',
      'driver' => 'mysql',
      'prefix' => '',
Verifying The New Architecture
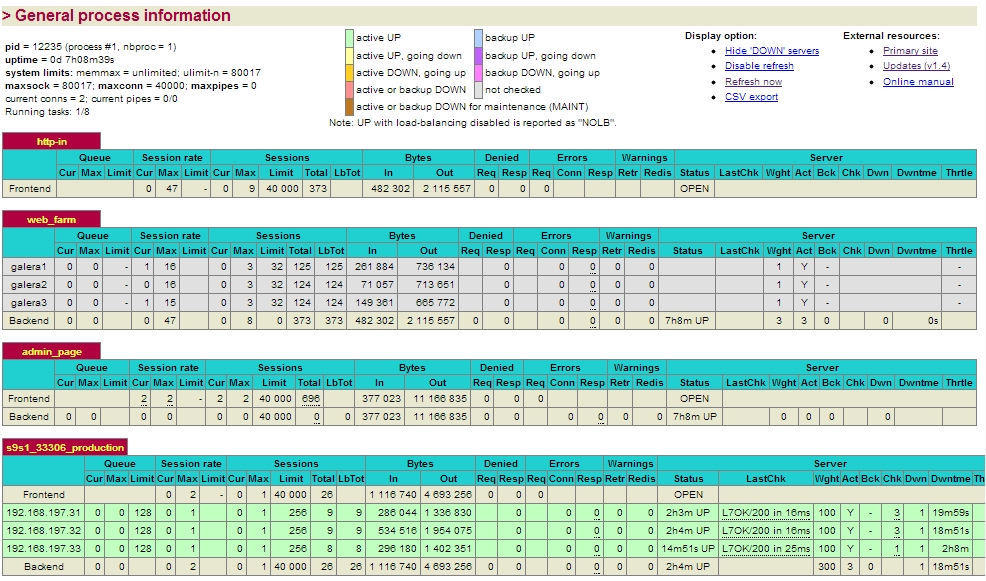
1. Check the HAproxy statistics by login into HAproxy admin page at lb1 host port 9600 using web browser. The default username and password are admin. You should see some bytes in and out on the web_farm and s9s_33306_production sections:
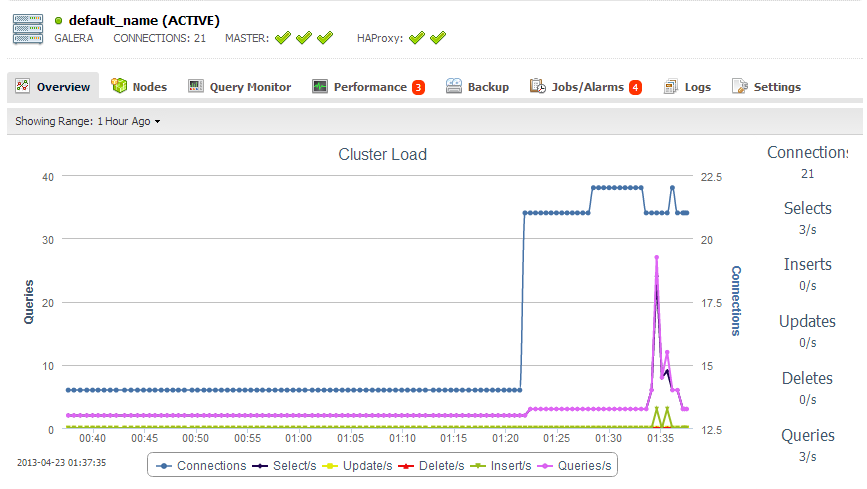
2. Check and observe the MySQL cluster load histogram by accessing ClusterControl’s cluster overview page at https://192.168.197.34:8080/clustercontrol similar to screenshot below:
3. Create a new article and upload a new image. Make sure the image file exists in all nodes.
Congratulations, you have now deployed a scalable drupal setup with clustering both at the web and the database layers.


