blog
WordPress Application Clustering Using Kubernetes with HAProxy and Keepalived

In a previous blog post, we showed you how to install Kubernetes on CentOS 7. Since then, there’s been a number of changes and we’ve seen the first production-ready release. The “minion” term has been changed to “node” and thousands of bug fixes and new features introduced.
![]()
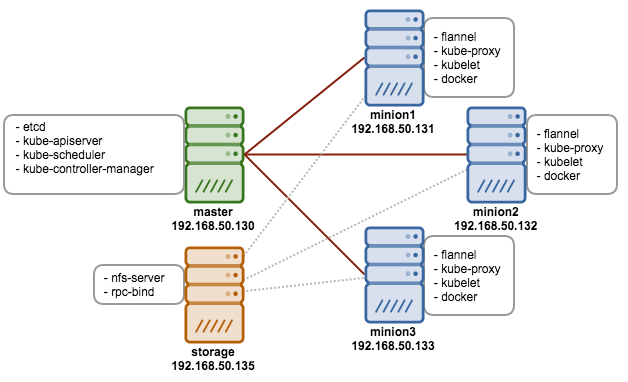
In this blog post, we’re going to play with Kubernetes application clustering and pods. We’ll use WordPress as the application, with a single MySQL server. We will also have HAProxy and Keepalived to provide simple packet forwarding (for external network) with high availability capability. We assume a Kubernetes master and three Kubernetes nodes are already deployed on CentOS 7 using instructions described in our previous blog post.
Setting up Persistent Disk
In order to achieve application clustering, we have to setup a persistent disk. This to ensure that all respective pods (which could be running on different minions) can access the same data. For bare-metal and on-premises deployment, we have several choices: NFS, GlusterFS or iSCSI. In this example, we are going to setup a simple NFS mount for the Kubernetes volume.
Our Kubernetes cluster architecture is illustrated below:
Note that we are running on Kubernetes v1.0.0-290-gb2dafdaef5acea, so the instructions described in this blog are applicable to that version.
Setting up NFS Server
Steps in this section should be performed on storage server.
1. Install NFS utilities and create a shared path:
$ yum install nfs-utils
$ mkdir -p /shared/kubernetes/web
$ mkdir -p /shared/kubernetes/db
2. Add following line into /etc/exports:
/shared 192.168.50.0/24(rw,sync,no_root_squash,no_all_squash)3. Restart NFS related services:
$ systemctl enable rpcbind
$ systemctl enable nfs-server
$ systemctl restart rpcbind
$ systemctl restart nfs-server
Setting up NFS Client
Steps in this section should be performed on all Kubernetes nodes (master and minions).
1. install NFS client so Kubernetes can mount it for persistent disk:
$ yum install nfs-utils2. Ensure you can see the NFS share on the storage server:
$ showmount -e 192.168.50.135
Export list for 192.168.50.135:
/shared 192.168.50.0/24
Create Persistent Volumes
Steps in this section should be performed on Kubernetes master (or Kubernete client via kubectl).
1. Create a persistent volume for WordPress. Create a definition file called nfs-web.yaml and add the following lines:
apiVersion: v1
kind: PersistentVolume
metadata:
  name: pv5gweb
spec:
  capacity:
    storage: 5Gi
  accessModes:
    - ReadWriteMany
  persistentVolumeReclaimPolicy: Recycle
  nfs:
    path: /shared/kubernetes/web
    server: 192.168.50.135
2. Create the object:
$ kubectl create -f nfs-web.yaml3. Create a persistent volume for MySQL data. Create a definition file called nfs-db.yaml and add the following lines:
apiVersion: v1
kind: PersistentVolume
metadata:
  name: pv5gdb
spec:
  capacity:
    storage: 5Gi
  accessModes:
    - ReadWriteMany
  persistentVolumeReclaimPolicy: Recycle
  nfs:
    path: /shared/kubernetes/db
    server: 192.168.50.135
4. Create the object:
$ kubectl create -f nfs-db.yaml5. List the persistent volumes to verify their existence:
$ kubectl get pv
NAME        LABELS    CAPACITY     ACCESSMODES   STATUS      CLAIM     REASON
pv5gweb         5368709120   RWO           Available
pv5gdb          5368709120   RWO           Available
Create Persistent Volume Claims
The steps in this section should be performed on the Kubernetes master (or Kubernete client via kubectl).
1. Create a persistent volume claim for WordPress. We are going to use 3GB of storage for WordPress data. Create a definition file called claim-web.yaml and add following lines:
kind: PersistentVolumeClaim
apiVersion: v1
metadata:
  name: myclaim-web
spec:
  accessModes:
    - ReadWriteMany
  resources:
    requests:
      storage: 3Gi
2. Create the object:
$ kubectl create -f claim-web.yaml3. Create a persistent volume claim for MySQL data. Create a definition file called claim-db.yaml and add the following lines:
kind: PersistentVolumeClaim
apiVersion: v1
metadata:
  name: myclaim-db
spec:
  accessModes:
    - ReadWriteMany
  resources:
    requests:
      storage: 5Gi
4. Create the object:
$ kubectl create -f claim-db.yaml5. List the persistent volumes and claims to verify their existence:
$ kubectl get pv,pvc
NAME      LABELS    CAPACITY     ACCESSMODES   STATUS    CLAIM                 REASON
pv5gweb       5368709120   RWX           Bound     default/myclaim-web
pv5gdb        5368709120   RWX           Bound     default/myclaim-db
NAME          LABELS    STATUS    VOLUME
myclaim-web   map[]     Bound     pv5gweb
myclaim-db    map[]     Bound     pv5gdb
Now we are ready to deploy our application cluster.
Deploying MySQL Pod
Steps in this section should be performed on Kubernetes master (or Kubernete client via kubectl).
1. MySQL is required to be the backend for the WordPress. Create a definition file called mysql-pod.yaml and add the following lines:
apiVersion: v1
kind: Pod
metadata:
  name: mysql
  labels:
    name: mysql
spec:
  containers:
      image: mysql
      name: mysql
      env:
        - name: MYSQL_ROOT_PASSWORD
          # change this
          value: yourpassword
      ports:
        - containerPort: 3306
          name: mysql
      volumeMounts:
          # name must match the volume name below
        - name: mysql-persistent-storage
          # mount path within the container
          mountPath: /var/lib/mysql
  volumes:
    - name: mysql-persistent-storage
      persistentVolumeClaim:
       claimName: myclaim-db
2. Create the object:
$ kubectl create -f mysql-pod.yaml3. We are going to assign a dedicated MySQL service IP address (clusterIP) so all WordPress pods are connected to this one single MySQL database. Create mysql-service.yaml and add following lines:
apiVersion: v1
kind: Service
metadata:
  labels:
    name: mysql
  name: mysql
spec:
  clusterIP: 10.254.10.20
  ports:
    - port: 3306
  selector:
    name: mysql
4. Create the object:
$ kubectl create -f mysql-service.yaml5. Verify that the pod and service are created:
$ kubectl get pods,services
NAME             READY     STATUS    RESTARTS   AGE
mysql            1/1       Running   1          4d
NAME         LABELS                                    SELECTOR        IP(S)          PORT(S)
kubernetes   component=apiserver,provider=kubernetes             10.254.0.1     443/TCP
mysql        name=mysql                                name=mysql      10.254.10.20   3306/TCP
The IP address for the mysql service must match the clusterIP defined inside mysql-service.yaml. We are going to use that IP address as MySQL host for the WordPress pods as described in the next section.
Deploying WordPress Replication Controller
Steps in this section should be performed on Kubernetes master (or Kubernete client via kubectl).
1. Create a WordPress replication controller (instead of single pod) by adding the following lines in wordpress-rc.yaml:
apiVersion: v1
kind: ReplicationController
metadata:
  name: frontend
  labels:
    name: frontend
spec:
  replicas: 3
  selector:
    name: frontend
  template:
    metadata:
      labels:
        name: frontend
    spec:
      containers:
      - name: wordpress
        image: wordpress
        ports:
        - containerPort: 80
          name: wordpress
        env:
          - name: WORDPRESS_DB_PASSWORD
            # change this - must match mysql.yaml password
            value: yourpassword
          - name: WORDPRESS_DB_HOST
            value: 10.254.10.20
        volumeMounts:
            # name must match the volume name below
          - name: wordpress-persistent-storage
            # mount path within the container
            mountPath: /var/www/html
      volumes:
        - name: wordpress-persistent-storage
          persistentVolumeClaim:
           claimName: myclaim-web
2. Create the object:
$ kubectl create -f wordpress-rc.yamlHere is what you would see in the /var/log/messages:
Sep  1 18:17:21 kube-master kube-scheduler: I0901 18:17:21.302311     888 event.go:203] Event(api.ObjectReference{Kind:"Pod", Namespace:"default", Name:"frontend-y2b96", UID:"a1b1b125-5092-11e5-9f33-000c29cf0af4", APIVersion:"v1", ResourceVersion:"31950", FieldPath:""}): reason: 'scheduled' Successfully assigned frontend-y2b96 to 192.168.50.131
Sep  1 18:17:21 kube-master kube-scheduler: I0901 18:17:21.307555     888 event.go:203] Event(api.ObjectReference{Kind:"Pod", Namespace:"default", Name:"frontend-oe7eh", UID:"a1b1bfc6-5092-11e5-9f33-000c29cf0af4", APIVersion:"v1", ResourceVersion:"31951", FieldPath:""}): reason: 'scheduled' Successfully assigned frontend-oe7eh to 192.168.50.132
Sep  1 18:17:21 kube-master kube-scheduler: I0901 18:17:21.315716     888 event.go:203] Event(api.ObjectReference{Kind:"Pod", Namespace:"default", Name:"frontend-xrk64", UID:"a1b1ce2a-5092-11e5-9f33-000c29cf0af4", APIVersion:"v1", ResourceVersion:"31952", FieldPath:""}): reason: 'scheduled' Successfully assigned frontend-xrk64 to 192.168.50.133
3. Create the service for WordPress replication controller in a definition file called wordpress-service.yaml by adding the following lines:
apiVersion: v1
kind: Service
metadata:
  labels:
    name: frontend
  name: frontend
spec:
  clusterIP: 10.254.10.10
  ports:
    # the port that this service should serve on
    - port: 80
  # label keys and values that must match in order to receive traffic for this service
  selector:
    name: frontend
4. Create the object:
$ kubectl create -f wordpress-service.yaml5. Verify the created pods and services:
$ kubectl get pods,services
NAME             READY     STATUS    RESTARTS   AGE
frontend-y2b96   1/1       Running   0          3h
frontend-oe7eh   1/1       Running   0          3h
frontend-xrk64   1/1       Running   0          3h
mysql            1/1       Running   1          4d
NAME         LABELS                                    SELECTOR        IP(S)          PORT(S)
frontend     name=frontend                             name=frontend   10.254.10.10   80/TCP
kubernetes   component=apiserver,provider=kubernetes             10.254.0.1     443/TCP
mysql        name=mysql                                name=mysql      10.254.10.20   3306/TCP
At this moment, you can actually access the WordPress site locally inside any of the minions via a frontend service IP address. Run the following command on any minions and you should get a 200 OK in the HTTP return code:
$ curl -I http://10.254.10.10/
HTTP/1.1 200 OK
Date: Wed, 02 Sep 2015 05:33:50 GMT
Server: Apache/2.4.10 (Debian) PHP/5.6.12
X-Powered-By: PHP/5.6.12
X-Pingback: http://192.168.50.131/xmlrpc.php
Content-Type: text/html; charset=UTF-8
This service IP address is not routable outside of the Kubernetes cluster. So, our next step is to setup an HAProxy on some of the Kubernetes nodes (in this case, we chose minion1 and minion3) for simple packet forwarding to Kubernetes service IP address.
Deploying HAProxy for packet forwarding
Steps in this section should be performed on Kubernetes minion1 and minion3.
1. Install HAProxy via package manager:
$ yum -y install haproxy2. Add the following lines into /etc/haproxy/haproxy.cfg:
global
    log 127.0.0.1   local0
    log 127.0.0.1   local1 notice
    user haproxy
    group haproxy

defaults
    log     global
    mode    http
    option  httplog
    option  dontlognull
    option forwardfor
    option http-server-close
    contimeout 5000
    clitimeout 50000
    srvtimeout 50000
    errorfile 400 /usr/share/haproxy/400.http
    errorfile 403 /usr/share/haproxy/403.http
    errorfile 408 /usr/share/haproxy/408.http
    errorfile 500 /usr/share/haproxy/500.http
    errorfile 502 /usr/share/haproxy/502.http
    errorfile 503 /usr/share/haproxy/503.http
    errorfile 504 /usr/share/haproxy/504.http
    stats enable
    stats auth admin:password
    stats uri /stats

frontend all
    bind *:80
    use_backend wordpress_80

backend wordpress_80
    option httpclose
    option forwardfor
    option httpchk HEAD /readme.html HTTP/1.0
    server kube-service-web 10.254.10.10:80 check
3. Enable HAproxy on boot and start it up:
$ sysctemctl enable haproxy
$ sysctemctl start haproxy
4. You should see HAproxy is listening on port 80:
$ netstat -tulpn | grep haproxy
tcp        0      0 0.0.0.0:80              0.0.0.0:*               LISTEN      61024/haproxy
Now go to http://192.168.50.131/stats or http://192.168.50.133/stats and login with admin/password:
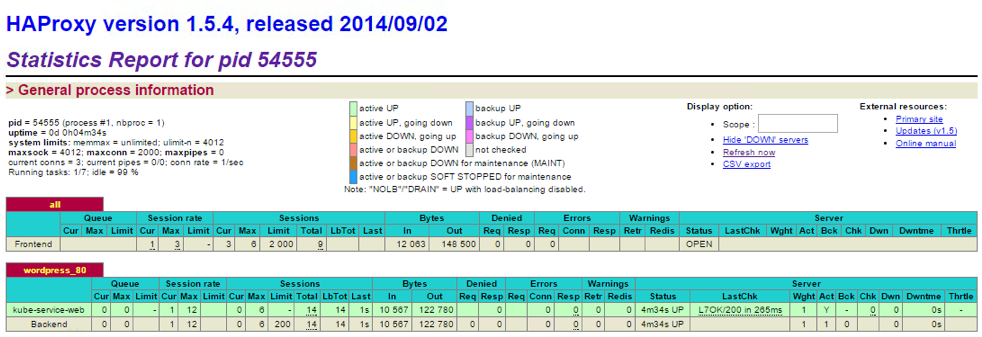
Load balancing to the pods will be done internally by Kubernetes via services, not via HAProxy since we just defined a single backend host, which is the Kubernetes service IP address. HAProxy is just a reverse proxy to access Kubernetes service network which is not routable outside.
Deploying Keepalived for Virtual IP address
The last part would be setting up virtual IP address, 192.168.50.100 for high availability so it floats between two load balancers and eliminates any single point of failure if one of the load balancers (also a minion in this setup) goes down. The following steps should be performed on minion1 and minion3 unless specified otherwise.
1. Install Keepalived via package manager:
$ yum install -y keepalived2. Clear the existing configuration lines and add the following lines on the respective nodes:
minion1 (aka lb1):
vrrp_script chk_haproxy {
        script "killall -0 haproxy"
        interval 2
        weight 2
}

vrrp_instance VI_1 {
        interface eth0
        state MASTER
        virtual_router_id 51
        priority 101                    # 101 on master, 100 on backup
        virtual_ipaddress {
            192.168.50.100        # the virtual IP
        }
        track_script {
            chk_haproxy
        }
}
minion3 (aka lb3):
vrrp_script chk_haproxy {
        script "killall -0 haproxy"
        interval 2
        weight 2
}

vrrp_instance VI_1 {
        interface eth0
        state MASTER
        virtual_router_id 51
        priority 100                    # 101 on master, 100 on backup
        virtual_ipaddress {
            192.168.50.100        # the virtual IP
        }
        track_script {
            chk_haproxy
        }
}
3. Enable the service on boot and start it up:
$ systemctl enable keepalived
$ systemctl start keepalived
4. Verify that minion1 is promoted to MASTER while minion3 is demoted to BACKUP state:
minion1 (aka lb1):
Sep  2 18:38:16 kube-node3 Keepalived_healthcheckers[46245]: Opening file '/etc/keepalived/keepalived.conf'.
Sep  2 18:38:16 kube-node3 Keepalived_healthcheckers[46245]: Configuration is using : 5556 Bytes
Sep  2 18:38:16 kube-node3 Keepalived_healthcheckers[46245]: Using LinkWatch kernel netlink reflector...
Sep  2 18:38:16 kube-node3 Keepalived_vrrp[46246]: VRRP_Script(chk_haproxy) succeeded
Sep  2 18:38:17 kube-node3 Keepalived_vrrp[46246]: VRRP_Instance(VI_1) Transition to MASTER STATE
Sep  2 18:38:18 kube-node3 Keepalived_vrrp[46246]: VRRP_Instance(VI_1) Entering MASTER STATE
Sep  2 18:38:18 kube-node3 Keepalived_vrrp[46246]: VRRP_Instance(VI_1) setting protocol VIPs.
Sep  2 18:38:18 kube-node3 Keepalived_vrrp[46246]: VRRP_Instance(VI_1) Sending gratuitous ARPs on eth0 for 192.168.50.100
Sep  2 18:38:18 kube-node3 Keepalived_healthcheckers[46245]: Netlink reflector reports IP 192.168.55.100 added
minion3 (aka lb3):
Sep  2 18:39:18 kube-node1 Keepalived_vrrp[24672]: Opening file '/etc/keepalived/keepalived.conf'.
Sep  2 18:39:18 kube-node1 Keepalived_vrrp[24672]: Configuration is using : 61953 Bytes
Sep  2 18:39:18 kube-node1 Keepalived_vrrp[24672]: Using LinkWatch kernel netlink reflector...
Sep  2 18:39:18 kube-node1 Keepalived_vrrp[24672]: VRRP sockpool: [ifindex(2), proto(112), unicast(0), fd(10,11)]
Sep  2 18:39:18 kube-node1 Keepalived_vrrp[24672]: VRRP_Instance(VI_1) Transition to MASTER STATE
Sep  2 18:39:18 kube-node1 Keepalived_vrrp[24672]: VRRP_Instance(VI_1) Received higher prio advert
Sep  2 18:39:18 kube-node1 Keepalived_vrrp[24672]: VRRP_Instance(VI_1) Entering BACKUP STATE
Now we are all set. We can setup the WordPress application and access it via virtual IP address, http://192.168.50.100/ .
Testing
Access the WordPress via virtual IP address at http://192.168.50.100/ and you should see the WordPress setup page:
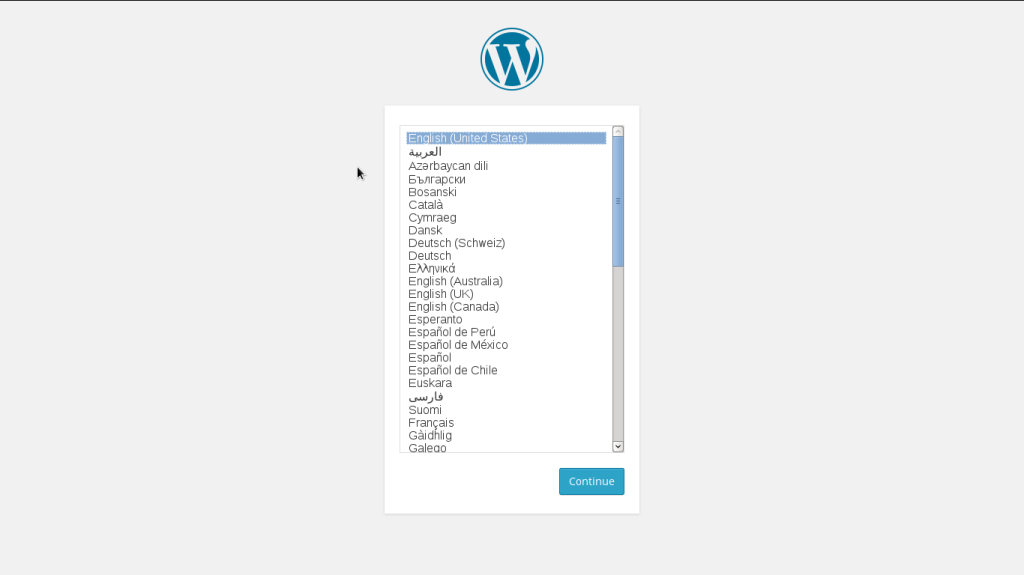
Follow the installation wizard until the end and you’ll have WordPress ready and running in high availability setup. If one of the minions goes down, Kubernetes will automatically fire up a new container to match the replication controller definition. In this case, we defined our WordPress application to run in three replicas.
Notes
- The pod (container) allocation is dynamic and automatically provisioned by Kubernetes. User can access the pod via Kubernetes service address transparently, without knowing the actual location of the pod.
- In this example, MySQL pod is still a single-point-of-failure. We can eliminate this by using Galera Cluster or MySQL replication outside of Kubernetes and exclusively use Kubernetes to host our application clusters, or
- Deploy a Galera Cluster inside Kubernetes as the MySQL backend, as mentioned in this blog post.


